
Patch design on fabric is a small canvas that tells a story, signals belonging, or simply adds personality to a garment. Mastering patch design color theory helps you choose palettes that pop on textiles while keeping legibility. Strong patch layout ideas drive balance and readability, guiding how elements are arranged around a focal point. Texture in patch design adds depth, with stitches and layering that catch light and invite touch. From this guide, you’ll gain embroidery patch design tips and patch design inspiration to translate concept into production.
Equally, designers explore badge creation on fabric as a craft that blends color, form, and texture into wearable art. Think of embroidered patches as compact branding elements, where the language shifts to emblems, fabric adornments, and surface texture. LSI principles suggest pairing related terms like color theory, layout considerations for logos, and texture techniques to reinforce recognition. As you plan, consider how these fabric accents communicate identity across clothing lines and accessories.
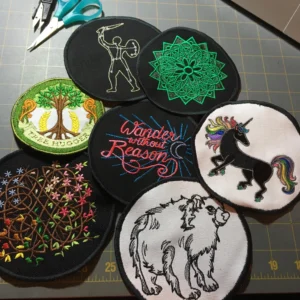
Patch design color theory: choosing hues that read on fabric
Color is the first language a patch speaks. Understanding patch design color theory helps you select combinations that pop on fabric, remain legible from a distance, and align with brand or club identity.
Start with the color wheel: pick a dominant color and add accent pairs from the complementary or analogous side. For example, a navy patch with gold accents reads as premium and stays legible on most fabrics. For calmer patches, analogous blues, teals, and greens create harmony with lower contrast.
Contrast and legibility are essential. A patch with text on a busy background can be hard to read, so use a light or dark outline or a contrasting fill behind the type. Applying patch design color theory early saves revisions and helps ensure color consistency across production batches.
Patch layout ideas: structuring elements for impact
Patch layout ideas begin with a focal point. A strong patch has one element your eye lands on first, then moves to supporting elements that reinforce the story.
Shapes, negative space, and grids govern readability. Circular patches read softly, shields convey tradition, and rectangular layouts maximize text visibility. Patch layout ideas range from emblem-centered designs to stacked typography; sketch several options and test legibility at varying viewing distances.
Typography should be legible at the final patch size. Choose simple, sturdy typefaces and allow ample padding around text to prevent crowding.
Texture in patch design: stitching, materials, and tactile depth
Texture in patch design describes the tactile depth created by stitches, layering, and material choices.
Embroidery stitches vary in thickness and sheen: satin stitches crisp edges, fill stitches cover large areas, and overlay textures like couching add lift that catches light and invites touch.
Thread finishes and backing materials contribute to texture too. Metallic threads add sparkle but can be less durable in washing, while matte cotton threads offer a more understated look. Pairing textures with fabrics such as felt, leather, or denim creates distinct tactile stories.
Embroidery patch design tips: production-ready decisions
Embroidery patch design tips: practical steps to production readiness.
Stabilizers under the patch prevent fabric puckering, and backing choices affect attachment and durability in laundering. Plan to specify stitch types, density, and edge treatment in your production file.
Patch design inspiration: finding sources and translating ideas
Patch design inspiration: look to streetwear, sports teams, clubs, and organizations to understand how color, layout, and texture balance.
Analyze focal points, typography handling, and texture use in existing patches, then adapt those concepts to your own designs while respecting production realities.
Patch design in practice: from concept to production readiness
Patch design in practice: from concept to production readiness.
Account for stabilizers, backing, thread colors, and stitch density; ensure you request a production proof to verify stitch behavior on the fabric you’ll use.
With patient iteration and feedback, your patches will wear well and become recognizable wearable art that people love to collect.
Frequently Asked Questions
What is patch design color theory and how does it guide color choices on patches?
Patch design color theory guides hue selection to keep patches legible and on-brand. Start with a dominant color and add accents using complementary or analogous schemes, ensure strong contrast for legibility, and consider outlining text or using contrasting fills to separate elements; planning colors early helps avoid muddy reproductions.
What are patch layout ideas to maximize impact and readability on patches?
Patch layout ideas center a strong focal point and use supporting elements with mindful shapes and negative space. Use grids for alignment, choose legible typography at the target patch size, and sketch multiple layouts to test readability from different viewing distances.
How does texture in patch design add depth without compromising readability?
Texture in patch design uses stitches, layering, and material variety to create depth while maintaining legibility. Employ satin, fill, and overlay stitches strategically, test textures on swatches, and ensure the texture enhances contrast rather than obscuring text or key imagery.
What embroidery patch design tips help avoid common pitfalls?
Embroidery patch design tips include starting with thumbnail concepts, limiting the color palette to 3–5 colors, testing proportions at 1:1 scale, ensuring clean edge finishing, and collecting feedback to improve clarity and production feasibility.
How can patch design inspiration be used to create market-ready patches?
Patch design inspiration should be analyzed from real-world patches to understand focal points, typography handling, and texture usage. Translate those insights into bold color accents, clear layouts, and a texture strategy that respects production realities to create patches that are memorable and wearable.
What production considerations should be aligned with patch design color theory and patch layout ideas during development?
During development, align color choices with fabric and thread palettes, manage color consistency across dye lots with swatches, request production proofs, and plan stabilizers, backing, and edge finishing to ensure the final patch matches the intended patch design color theory and layout ideas.
| Topic | Key Points |
|---|---|
| Introduction |
|
| Color Theory and Patch Design |
|
| Layout Principles for Patches |
|
| Texture and Embroidery: Adding Depth to Patch Design |
|
| Production Readiness: Materials, Techniques, and Quality |
|
| Practical Patch Design Tips and Common Pitfalls |
|
| Inspiration and Real-World Patch Design Examples |
|
Summary
Patch design is a fusion of art and craft. By applying color theory thoughtfully, laying out elements with balance and legibility, and layering texture to add depth, you create patches that aren’t just decorative but expressive and durable. Consider production realities such as stabilizers, backing options, stitch types, and edge finishing to translate concept into wearables. With practice and feedback, your Patch design work can become consistently stunning wearable art.