
DIY embroidered patches turn everyday garments into bold statements, transforming the way you wear denim jackets, canvas backpacks, and casual hoodies by letting you layer color, texture, and meaning into a single accessory that feels personal and contemporary, like a whispered handcraft in a world of mass-produced embellishments, with planning and patience ensuring durability, a clean edge, vibrant color, and a design that stays vibrant through repeated wear and washing, while inviting you to map out color palettes, test stitch density on scraps, and sketch how a patch will interact with seams, folds, and garment construction before you commit to thread and fabric.
For many crafters, embroidered patches at home become the workshop where design ideas translate into tangible patches, guiding you through choosing a patch shape, testing color combinations, preparing stabilizers and backing, planning the order of stitches so your final piece feels cohesive rather than stitched together, and considering garment care, washing temperatures, and backing choices that suit your preferred method.
To keep the project approachable, a patch making tutorial can break the work into manageable stages: sketching and transferring a design, selecting stabilizers to prevent distortion, hooping and tension setup, stitching order, edge finishing, backing options, thread selection, color management, and testing on scrap fabric before committing to your actual patch so you can reproduce results consistently when making multiple patches.
By using machine embroidery patches, you can achieve speed and consistency for larger runs while applying hooping, stabilizers, thread tension, and finishing techniques that yield a professional look with crisp outlines, balanced color, and secure edges.
Whether your goal is a single personalized badge or a coordinated batch for a club, team, brand, or handmade shop, this method helps you grow from curiosity to confidence, turning ideas into repeatable techniques and a toolkit of go-to materials that yields professional-looking patches you’re proud to wear, gift, or sell.
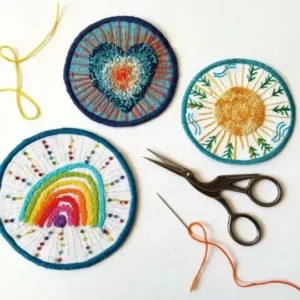
DIY embroidered patches: turning ideas into wearable art
DIY embroidered patches let you turn a sketch into wearable art at home. This approach puts you in the driver’s seat, letting you control size, color, and edge finish so your patches feel polished and personal. Whether you’re patching a denim jacket or a backpack for a club, a well-planned patch can look as professional as store-bought designs.
This is the patch making tutorial mindset in action: start with a simple, bold shape, test color blocks, and refine your design before stitching. If you’re curious how to make embroidered patches, begin with a 2- to 4-inch footprint for many shapes and choose high-contrast colors to keep edges legible from a distance.
Choosing materials for embroidered patches at home
For embroidered patches at home, the base fabric and stabilizer choices set the stage. Twill, canvas, felt, or denim scraps each bring a different feel and edge stability. Pair your patch fabric with a stabilizer that suits your design—cut-away for dense fills, tear-away for lighter work—and you’ll reduce distortion during stitching.
Thread choice matters for durability and finish. Polyester blends stand up to washing and wear, while rayon offers a sheen in decorative patches. Backing options—iron-on, sew-on, or no backing—affect how the patch attaches and how long it lasts in regular use.
Transferring designs and stabilizing fabric: the crucial first steps
The transfer step sets the patch’s final silhouette. Use a water-soluble pen or fusible web to trace the design onto the patch fabric, then attach stabilizers to the back to keep the fabric stable during stitching. For hand embroidery patches, you can print the design on transfer paper and trace lightly.
Hooping and fabric tension are essential for clean edges. Mount the fabric in your embroidery hoop so it’s taut but not overstretched, ensuring consistent stitch placement. Even when stitching by hand, a light stabilizer helps minimize puckering and keeps your lines crisp.
Machine embroidery patches: technique, stitches, and finishing
Machine embroidery patches leverage speed and precision. Use a dense satin stitch around the border to create a clean edge, then fill larger areas with satin or tatami fills. An underlay stitch stabilizes the fabric, especially on lighter bases, delivering crisp lines and durable color.
Edge finishing defines the final look. If your equipment can’t merrow the edge, mimic a factory finish with a tight satin border and careful trimming. Pair with an appropriate backing to finish your patches so they resemble ready-made products, even when you’re working at home.
Hand embroidery patches: slow, personal, and tactile
Hand embroidery patches offer texture and individuality that can be hard to match with machine work. Techniques like backstitch, split stitch, and satin fills create dimensional surfaces and subtle shading. A dense thread count and neat edges help ensure durability on garments worn often.
Small batches or custom gifts are ideal for hand embroidery patches. The process takes longer, but the personal touch shines through, producing patches that feel unique. With steady hands and good threads, you can achieve a finish that stands up to washes and wear.
Finishing, backing options, and care to keep patches durable
Finishing touches and backing options influence both appearance and attachment. Iron-on backings provide a quick, no-sew option, but durability varies with heat and laundering. Sew-on backings are typically the most durable for rugged wear, especially in active garments.
Care instructions and testing are part of a professional finish. Use colorfast threads, pre-test color changes on scraps, trim away stabilizer remnants, and consider a final light border to seal the edge. Proper finishing ensures your patches remain vibrant and intact through many wash cycles.
Frequently Asked Questions
What are DIY embroidered patches and how can I start making them at home?
DIY embroidered patches are small fabric designs stitched onto a base that you attach to clothing or bags. To begin at home, choose a simple shape, select a patch base (twill, felt, or denim), pick a stabilizer, gather embroidery threads, and plan your design transfer. Whether you’re exploring machine embroidery patches or hand embroidery patches, start with a clear design and practice on scraps to build confidence.
How to make embroidered patches at home: should I use machine embroidery patches or hand embroidery patches?
Most people start with machine embroidery patches for speed and consistent results, but hand embroidery patches offer a personal, artisanal look. Start by designing or tracing a simple emblem, then transfer it to your patch fabric. Hoop the fabric with stabilizer, stitch the outline and fills, finish the edge, and choose a backing for attachment. This approach works well for both DIY embroidered patches and small-batch projects.
What stabilizers and backing should I use for DIY embroidered patches at home?
For DIY embroidered patches at home, use a stabilizer that provides the right level of support for your design—tear-away for lighter fills and cut-away for dense areas. Choose a backing like iron-on or sew-on based on how you’ll attach the patch; for durability, sew-on is often best. Remember to remove excess stabilizer after finishing to keep the patch neat.
How can I achieve professional edges in a patch making tutorial for DIY embroidered patches?
A professional edge is typically achieved with a dense satin border or a merrow-like finish. If you don’t have a merrow machine, you can simulate the look with a tight satin stitch around the edge and careful trimming. In a patch making tutorial, prioritize precise edge stitching and a clean border to mimic factory-produced patches.
What are common issues when making DIY embroidered patches at home and how can I troubleshoot them?
Common issues include puckering from fabric distortion, loose threads or breaks, color bleeding, and uneven edges. Fix puckering by using a proper stabilizer and keeping fabrics taut in the hoop. Re-thread and check tension for breaks, test colorfastness on scrap fabric, and adjust your edge stitching to reduce uneven borders.
What design tips help when creating DIY embroidered patches at home, for machine embroidery patches and hand embroidery patches?
Start with bold, simple shapes that read well at small sizes and transfer the design to a vector-friendly format for clean edges. Use strong color blocks and clearly separated outlines to improve legibility. For machine embroidery patches, plan color changes to minimize stops; for hand embroidery patches, choose dense stitches for durability. Always test your design on scraps to ensure it translates well to both DIY embroidered patches and patch making tutorials.
| Aspect | Key Points | Notes / Practical Tips |
|---|---|---|
| What makes patches look professional | Crisp shape, clean edges, consistent stitching | Stable foundation, careful design transfer, appropriate stabilizers, high-quality threads, precise edge finishing; soft-looking patches usually result from insufficient stabilizer, fabric, or stitch density. |
| Design and size | Start with simple shapes; use bold outlines and distinct color blocks; aim for scalable, vector-friendly edges | Patch sizes: 2–3 inch diameter circles or 2–4 inch wide rectangles; re-draw designs as vector-friendly versions for clean edges. |
| Materials and design choices | Patch base fabric (twill/canvas/felt); stabilizer (tear-away or cut-away); embroidery threads (polyester or rayon); backing options (iron-on, sew-on, or none) | Choose materials with durability and your backing choice in mind; plan color contrasts and edge finishing early. |
| Stabilizers | Use stabilizers that stabilize but are easy to remove after embroidery; cut-away for dense fills; tear-away for light fills | Be mindful of distortion when removing tear-away; cut-away provides durable support after trimming. |
| Tools and supplies | Machine with hoop, embroidery hoop, stabilizer, patch fabric, stabilizer backing for edge finish, embroidery threads, scissors/knife, heat- or sew-on backing, transfer tools | Have a dedicated space for setup and keep tools organized for consistent results. |
| Step-by-step: from design to finished patch | 1) Design and transfer 2) Prepare base and stabilizer 3) Choose stitches & color plan 4) Stitching & color management 5) Edge finishing 6) Backing options & attachment 7) Finishing touches | Follow in order for predictable results; re-check alignment after hooping and before final stitching. |
| Edge finishing | Satin border for neat edge; merrow edge is ideal but requires appropriate equipment; you can simulate with dense satin then trim | Test edge density on a scrap before finalizing your patch; trimming should be done carefully. |
| Design options: machine vs hand | Machine patches: efficient for large batches; hand patches: small runs or personal touch | Choose based on batch size, detail, and equipment; machines enable quick color changes and consistent counts. |
| Common issues and troubleshooting | Puckering, loose threads, color bleeding, uneven edges | Adjust stabilizer weight, re-thread, test colorfastness, and refine edge stitching as needed. |
| Projects and ideas | Monograms, team logos, vintage denim patches, seasonal designs, custom patches for small brands | Use as portfolio pieces to showcase versatility across fabrics and finishes. |
Summary
Conclusion