
Attach embroidered patches to denim is a practical, creative skill that can transform jeans, jackets, and bags into unique personal statements. If you’re wondering how to attach embroidered patches to denim for everyday wear, this guide introduces durable methods and stylish options. From iron-on patches for denim to sew-on techniques, you’ll see how each approach affects look, wear, and care. Patch placement ideas for bags and other denim items help you design cohesive layouts rather than random clusters. You’ll also learn the best ways to secure patches to fabric and keep them looking sharp through washing.
In other words, applying decorative patches to sturdy denim becomes a form of wearable art, a practical embellishment that upgrades jeans, jackets, and bags. This broader framing uses terms like fabric patches, embroidery appliqués, and patchwork accents to communicate the same idea in search-friendly language. By exploring synonyms such as garment embellishments, sewn-on badges, and heat-pressed decals, the content aligns with Latent Semantic Indexing principles to improve relevance while keeping the prose natural.
Attach embroidered patches to denim: selecting the right method
When you’re deciding how to attach embroidered patches to denim, start by evaluating the patch backing and the item’s use. Iron-on, sew-on, or fusible web options each offer different levels of durability and finish, so choose based on how often the garment will be washed and worn. If you’re wondering how to attach embroidered patches to denim, consider the patch backing, the denim’s tight weave, and whether you want a temporary or permanent result.
This is the moment to think about patch size, shape, and placement. Denim benefits from careful prep: pre-washing to prevent shrinkage, dry patches, and a flat surface for alignment. By planning ahead, you’ll ensure the patches sit flat, don’t shift during attachment, and stay secure through regular wear and washing.
Iron-on patches for denim: quick applications and cautions
Iron-on patches for denim offer a fast route to a customized look. The heat-activated adhesive provides a strong base, especially when pressed with a protective cloth and the correct temperature setting. If you’re short on time, iron-on patches can jumpstart a project, but they’re not always the longest-lasting choice on heavy-wear areas.
For longevity, finish iron-on patches with a stitching line after heat-pressing—a simple running stitch or small zigzag around the edge helps prevent edges from peeling. This aligns with best practices for securing patches to fabric, giving you a more durable result while still keeping the patch design intact.
Sew-on patches: durability for jackets and bags
Sewing patches onto denim is the most durable option, particularly for items exposed to frequent washing or heavy use. You’ll often hear that sewing embroidered patches onto jackets is the way to go for longevity, especially on areas like sleeves and pockets where movement is frequent. Use a sturdy needle and appropriate stitch to ensure the patch becomes part of the fabric.
Edge finishes can vary from a neat satin stitch to a practical overcast stitch, with thread color chosen to blend or pop against the denim. Whether you’re doing a hand-stitched method or a machine approach, backstitching at the start and end helps prevent unraveling and keeps the patch securely attached.
Fusible web with sewing: a secure hybrid approach
A fusible web can be a helpful base to anchor patches before you sew, providing a temporary hold and cleaner edges. This approach reduces shifting during stitching and can be a bridge between iron-on convenience and sew-on durability. It’s a practical way to get the best of both worlds when attaching patches to denim.
After the patch has fused, finish with a running or zigzag stitch around the outside edge. This combination yields a stronger bond, minimizes bulk at curves, and aligns with the idea of the best ways to secure patches to fabric by adding a robust stitching layer after the adhesive has set.
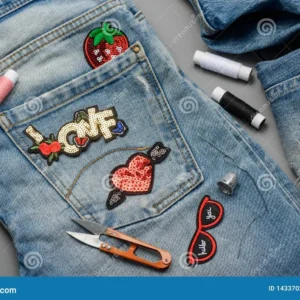
Patch placement ideas for bags and garments
Thoughtful patch placement elevates even simple denim pieces. Use focal points, symmetry, and a mix of patch shapes and sizes to create balance. For bags, front panels are a natural canvas; for jackets, consider sleeves, yoke areas, or back panels to tell a story with your patches.
The guide also suggests patch placement ideas for bags that emphasize visibility and readability from a distance, while small patches can add texture up close. Mixing textures and colors—denim with leather or canvas—can enhance contrast and style while keeping the overall composition cohesive.
Care, maintenance, and troubleshooting for patched denim
Patched denim requires careful care to maintain the bond and appearance. Washing should be gentle, preferably with the garment inside out on a cold cycle to protect the patches and their backings. Drying should be air-dried when possible to prolong the life of the stitching and adhesives.
Inspect patches after washing for loose threads or edge fraying, and re-stitch as needed. Understanding the common mistakes, like skipping prep or using the wrong needle or thread, can help you achieve durable results. By following these care and maintenance steps, you’ll ensure your patches stay secure and your denim remains looking sharp over time.
Frequently Asked Questions
How to attach embroidered patches to denim using sewing or iron-on methods?
To attach embroidered patches to denim, choose sew-on, iron-on, or fusible-web-then-sew approaches. Sew-on patches are the most durable on denim, so use a tight running stitch or small zigzag around the edge and backstitch at the start and end. If you opt for iron-on patches for denim, press with a hot iron and a protective cloth, then reinforce the edges with a few stitches for long wear.
How to sew embroidered patches onto jackets for a durable denim-style look?
Place patches on clean, dry fabric and secure with pins. Sew around the edges with a tight stitch, keeping stitches small to minimize visibility. For curved seams or thick areas, switch to a stronger needle and longer stitch length, finishing with backstitching and trimming loose threads.
Are iron-on patches for denim a good option, and how do you apply iron-on patches for denim?
Iron-on patches for denim can be quick and convenient, but longevity improves when you reinforce them with stitching. Apply heat per patch backing directions using a protective cloth, then let the patches cool. For durability, sew around the edge after ironing to prevent peeling during washing.
What patch placement ideas for bags work best when attaching embroidered patches to denim bags?
Patch placement ideas for bags start with a focal point on the front panel, then build a cohesive collage with smaller patches for balance. Use symmetry for a classic look or deliberate asymmetry for a modern vibe, and mark placements with chalk before sewing or ironing.
What are the best ways to secure patches to fabric when attaching embroidered patches to denim?
Best ways include sewing-on patches for the strongest hold, using a tight running stitch or small zigzag with backstitching. If using iron-on patches, fuse first and then sew around the edge to prevent peeling. A fusible web can help anchor patches before sewing, reducing shifting and delivering clean edges.
How should you prep when attaching embroidered patches to denim to ensure long-lasting adhesion?
Prep by washing and drying the denim to reduce shrinkage, then plan and outline placement before attaching. Secure patches with pins, choose the right needle and thread for denim, and consider an extra row of stitching on high-wear edges. Allow any adhesive to cure fully and follow care instructions to preserve adhesion through washing.
| Section | Key Points |
|---|---|
| Introduction},{ | |
| Materials & Preparation | Gather patches and base garment (denim items); prepare tools for sewing, iron-on, or fusible options; include chalk, pins, scissors, measuring tape, and heat protection. |
| Methods Overview | Iron-on, sew-on, and fusible web with sewing; each method has different durability, look, and care needs. |
| Step-by-step Overview | Step 1: plan placement; Step 2: position and fix patches; Step 3: apply via chosen method; Step 4: finish and inspect edges. |
| Care & Maintenance | Wash inside-out on cold; air-dry when possible; check and re-stitch edges as needed; store away from direct sunlight. |
| Common Mistakes | Skipping fabric prep, using the wrong needle/thread for denim, failing to secure edges, and overheating iron-on adhesives. |
| Best Practices | Plan a cohesive layout, pre-wash fabric, test patches on scrap, choose patches with suitable backing, and finish edges for durability. |
Summary
Attach embroidered patches to denim to transform plain jeans, jackets, and bags into personalized statements. This descriptive conclusion highlights choosing among sew-on, iron-on, and fusible options, with emphasis on preparation, patch placement, and secure stitching to ensure longevity through washing and wear. By following the guidance in this topic, you can create durable, stylish patched denim that reflects your unique style and stands up to regular use. Remember to test on a scrap piece, follow care labels, and select patches with appropriate backing for best results, so your denim pieces look great for years to come. Attach embroidered patches to denim can be a rewarding way to refresh wardrobe staples with creativity and personal flair.