
DIY Embroidered Patches have exploded in popularity, and for good reason, letting you personalize jackets, bags, jeans, hats, and sneakers with your own flair. This introductory guide serves as an embroidered patch tutorial for beginners, outlining a clear, step-by-step process you can start today. You’ll discover how to make patches at home using approachable stitches, basic transfer methods, and sturdy backing for durable results. If you’re refreshing a wardrobe or crafting a thoughtful gift, hand embroidery patches for beginners can build confidence without overwhelming you. From simple sew-on patches ideas to lasting DIY fabric patches, you’ll gain practical tips, design ideas, and a clear path to wearable art.
Beyond the exact term itself, you can think of this craft as fabric patches, stitched badges, or personalized textile decals that decorate clothing and bags. LSI-friendly phrasing includes terms like sewn-on embellishments, needlework patches, hand-stitched identifiers, and decorative fabric patches that describe the same creative practice. These alternative descriptors help search engines associate related topics such as embroidery basics, beginner stitchwork, and DIY garment adornments with your project. Whether you call them patches, badges, appliques, or fabric decals, the idea remains the same: quick, durable, and customizable textile accents. Use a mix of terms across your content to improve relevance while keeping readers engaged and informed.
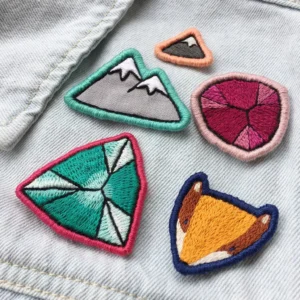
DIY Embroidered Patches for Beginners: Tools, Setup, and Starter Projects
A great patch starts with the right tools. For anyone exploring an embroidered patch tutorial for beginners, assembling a simple, affordable toolkit makes a big difference. You’ll want fabric or felt backing, a small embroidery hoop, sharp needles, and sturdy threads laid out in a palette that echoes the final look you envision. With these fundamentals, the workshop becomes a welcoming space where mistakes are part of the learning curve—and every stitch is a small step forward.
Choosing the right backing is essential for durable DIY fabric patches. An iron-on backing offers quick results, while sew-on backing provides extra longevity after washing. This forgiving setup is especially helpful for hand embroidery patches for beginners, proving that you don’t need expensive gear to start creating wearable art. The goal is steady progress and confidence-building as you gather experience.
Designing and Transferring Patterns: From Sketch to Stitch
Design sets the tone for your patch. In this stage, keep the motif simple and scalable, a principle you’ll appreciate if you’re following guidance from an embroidery patch tutorial for beginners. Start with a basic shape or initial letter and imagine how it will translate into color and texture when stitched. If you’re curious about how to make patches at home, this is the moment to sketch, print, or trace a comfortable-size pattern.
Transferring the design onto fabric is the second crucial step. Use light pencil lines or transfer paper, and consider adding a thin stabilizer on the back to minimize distortion. For hand embroidery patches for beginners, a clean silhouette with 2–4 colors makes the stitching approachable while still delivering a polished finish. You can always layer on more detail as your skills grow.
Stitch Choices and Techniques for Texture and Durability
Choosing the right stitches defines both the look and the life of your patch. Start with beginner-friendly options like outline stitches to define edges, and satin stitches to fill bold color blocks. For those following a hands-on path, these stitches are reliable and forgiving, helping you build skill without frustration while still producing a professional finish.
Texture and tiny details elevate a patch from plain to striking. Try lazy daisy stitches for petals, French knots for centers, and simple running stitches for delicate shading. If you’re exploring sew-on patches ideas, pairing a clean satin fill with subtle texture stitches around the edges creates a neat, durable result that remains flexible when applied to fabrics.
Step-by-Step Patch Assembly: Outlines, Fills, and Finishes
The assembly sequence guides you from design to wearable patch. Begin by preparing your fabric and hoop, then transfer the pattern and outline the shapes with a back stitch. This approach mirrors the structure you’d find in an embroidery patch tutorial for beginners and keeps the process approachable while you gain confidence.
Next comes color blocking and texture. Use satin stitches for large color areas, and add details with smaller stitches to create depth. Finish the patch edges with a blanket stitch for a tidy border, and decide on backing—iron-on, sew-on, or a combination. If you’re seeking sew-on patches ideas, consider stitching a few strong edges and a center anchor to improve durability during wear and wash.
Attaching, Finishing, and Caring for Your Patches
Attaching your patches is the moment of truth. Sew-on patches are secured with a tight back stitch around the edge, while iron-on patches require careful pressing per the product’s directions. For a robust result, many crafters blend methods—sew around the edge and apply a light, central iron to hold the design in place while the stitches set.
Care and longevity go hand in hand with technique. Turn garments inside-out before washing, use mild detergent, and avoid high heat drying when possible. Iron patches on the reverse side to protect the embroidery, and store completed patches flat to prevent distortion. With thoughtful care, your patches will stay vibrant and wearable for years.
Creative Variations and Maintenance: Expanding Your Patch Library
DIY fabric patches invite experimentation, from monograms and initials to themed designs and travel icons. This is where you can expand beyond basics and let your imagination run wild while staying grounded in solid stitching practice. By revisiting the core techniques, you’ll quickly grow a growing library of unique patches.
Layout planning and color coordination matter as your collection grows. Try assembling a small set of patches that tell a story or perfectly match a color scheme for a backpack or denim jacket. If you’re building skills for lifelong projects, these explorations reinforce what you’ve learned and keep your practice fun and purposeful, whether you’re revisiting an embroidered patch tutorial for beginners or simply crafting DIY fabric patches for personal wear.
Frequently Asked Questions
What are the essential tools for DIY Embroidered Patches for beginners?
For DIY Embroidered Patches, start with a sturdy fabric backing (unbleached cotton, felt, or canvas), a small 4-inch embroidery hoop to keep fabric taut, and a sharp embroidery needle with 6-strand floss. Add embroidery thread, stabilizer or tear-away backing, markers or transfer paper, scissors, a needle threader, and a sewing iron or heat press. Choose between iron-on or sew-on backing. These basics suit hand embroidery patches for beginners and keep costs down.
How do I design and transfer patterns for DIY fabric patches as part of an embroidered patch tutorial for beginners?
Begin with a simple design—letters, basic shapes, or a small motif—for your DIY fabric patches. Transfer the pattern onto the fabric using light pencil or transfer paper, and optionally add a stabilizer to reduce distortion. If using a heat-activated backing, you can print the design on iron-on transfer paper and follow the product directions. Keeping the design simple makes this embroidered patch tutorial for beginners easier to manage.
Which stitches work best for DIY Embroidered Patches for beginners, and what are good sew-on patches ideas?
For hand embroidery patches, start with outline stitches (back or stem) to define edges, and use satin stitch for bold color fills. Use running or back stitch for shading, and add small details with French knots or lazy daisies. Finish with a simple blanket stitch around the edge. These stitch choices pair well with sew-on patches ideas and are friendly for hand embroidery patches for beginners.
What is a simple step-by-step method to assemble a patch for DIY Embroidered Patches at home (how to make patches at home)?
Follow a clear sequence: 1) prepare fabric and stabilizer and place in the hoop; 2) transfer the design; 3) outline the shapes with a back or split stitch; 4) fill larger areas with satin stitch; 5) add texture with small stitches; 6) finish the edges with a blanket stitch; 7) apply backing (iron-on or sew-on) and press. This straightforward approach mirrors an at-home embroidery workflow for beginners.
How should I finish and attach patches to garments, and how should I care for DIY fabric patches?
Attach patches using sew-on stitches around the edge for durability, or use iron-on backing for quick application—many crafters combine methods for extra security. To care for DIY fabric patches, turn garments inside out before washing, use mild detergent, avoid high heat, and iron the patch from the reverse side to protect the embroidery. This care routine helps DIY fabric patches stay vibrant wash after wash.
What common issues arise with DIY Embroidered Patches and what creative variations can I try with sew-on patches ideas or DIY fabric patches?
Common issues include fabric puckering, uneven stitches, frayed edges, and color bleeding. Fix by loosening tension, re-centering the fabric, testing colors on scrap, and sealing edges with a zig-zag stitch. For creativity, explore monograms, themed or seasonal patches, mixed-media patches with felt or beads, color-block designs, and minimalist outlines—great ideas for sew-on patches ideas and expanding your DIY fabric patches library.
| Section | Key Points |
|---|---|
| Introduction | Presents purpose of patching, personalization, beginner-friendly guidance, and a foundation for the embroidery journey with design ideas and motivation. |
| Tools and Materials | Lists essential supplies (fabric/backing, hoop, needles, threads, stabilizer, transfer tools, backings) and notes affordability and beginner-friendliness. |
| Designing and Transferring | Encourages starting simple; outlines transferring by print/trace, optional stabilizer, and iron-on transfer options; 2–4 color designs recommended for beginners. |
| Stitch Choices and Techniques | Suggests beginner stitches (outline/back, satin, running, lazy daisy, French knot) and edge finishing; emphasizes planning and gradual skill growth. |
| Step-by-Step Patch Assembly | Photos/steps: hoop setup, design transfer, outline, color fill, texture, edge finish, backing, and final touches; focus on progress over perfection. |
| Finishing and Attaching | Describes sew-on and iron-on methods (or a combination); stresses durability and care; method choice depends on garment and use. |
| Troubleshooting and Pitfalls | Addresses puckering, uneven stitches, frayed edges, and color bleed with stabilizer use, tension checks, and deliberate practice. |
| Creative Ideas and Variations | Offers monograms, themed patches, mixed-media options, color-block designs, and minimalist approaches; start small and expand. |
| Maintenance and Longevity | Covers care tips: wash inside-out, mild detergent, reverse ironing, and flat storage to preserve patch integrity. |
| Conclusion | Summarizes learning journey and encourages ongoing practice, turning patches into wearable art through patience, experimentation, and consistent practice. |
Summary
DIY Embroidered Patches open a rewarding, accessible path to personal style and creativity through textiles. This descriptive overview summarizes how beginners can start with basic materials, simple transfers, and a handful of stitches to turn ordinary garments into wearable art. The journey emphasizes patience, practice, and playful experimentation, guiding you from foundational techniques to more intricate designs over time. By following the step-by-step process—from selecting tools and transferring patterns to outlining, filling, and finishing—anyone can gain confidence and build a growing patch collection. With care tips for washing and storage, your patches will stay vibrant and durable, ready to express your personality on jackets, backpacks, hats, and beyond.