
Measuring and Fitting Custom Shirts is the foundation of a shirt that feels designed for you. When you shop off-the-rack, you compromise on fit because standard sizes can’t capture your unique proportions. With a focus on custom shirt measurements and a practical shirt fitting guide, you tailor neck, chest, sleeves, and length to your body. This guide explains how to measure accurately, what tools to use, and how precise data translates into a flawless, natural drape. Whether you’re new to custom shirts or refreshing your knowledge, this approach helps you achieve a perfect shirt fit every time.
Beyond the basics, you’re effectively calibrating how a shirt sits on your frame through a body-aware approach to measurements and pattern adjustments. Think of it as a systematic fit strategy where precise data informs pattern changes, fabric behavior, and overall silhouette. If you want structured guidance, a reliable shirt fitting guide explains how to measure for a tailored shirt, including neck, chest, and sleeve allowances. By embracing these principles, you can plan small alterations for a truly balanced look, such as shirt alterations for custom shirts that refine shoulders, hem, and back length. In short, the goal is a natural drape, comfortable movement, and a consistent fit you can repeat across future shirts.
Measuring and Fitting Custom Shirts
Measuring and Fitting Custom Shirts is the foundation of a shirt that feels designed for you. When you buy off-the-rack, you’re choosing a size that may only approximate your measurements. With custom shirts, you have the opportunity to tailor every detail to your body and style. The result is a garment that drapes well, moves with you, and presents a polished silhouette—every time you wear it. In this guide, you’ll learn why precise measuring matters, which tools to use, a step-by-step method for accurate measurements, and practical fitting tips to achieve the perfect shirt fit.
To start, understanding custom shirt measurements and how to measure for a tailored shirt sets you up for consistency. A reliable shirt fitting guide will help you translate numbers into a wearable silhouette, ensuring a perfect shirt fit across different fabrics and occasions. By embracing precise measurements, you’ll reduce post-purchase adjustments and enjoy a cleaner, more confident look every day.
The Tools You Need for Accurate Custom Shirt Measurements
The right tools make all the difference in measuring accuracy. Gather a soft measuring tape, a notepad or digital recording method, a full-length mirror, and a helpful assistant if possible. Wearing lightweight clothing or measuring over a well-fitted shirt helps you capture numbers that reflect your typical wear. With these basics, you can build a dependable data set for custom shirt measurements that your tailor can trust.
Having a friend or tailor assist you can improve accuracy, especially for shoulder width, back length, and sleeve measurements. Use a flexible fabric tape rather than a rigid metal one to avoid digging in or slipping. Remember to record measurements consistently in inches or centimeters and double-check them after a short rest to account for any posture shifts.
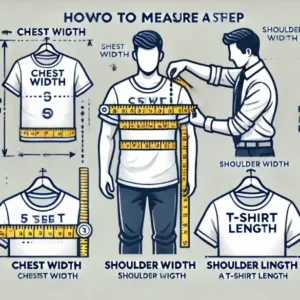
Key Measurements for a Perfect Shirt Fit: Neck, Chest, and Shoulders
Neck/Collar: Stand tall, relax your shoulders, and measure around the base of your neck where the collar sits, allowing about 0.5 to 1 inch of ease for comfort. This neck measurement is often the most critical for draft quality and comfort in dress shirts. Chest/Bust: With the tape around the fullest part of your chest, keep it snug but not tight, breathing normally to allow fabric ease. Shoulders: Measure across the back from one shoulder edge to the other to determine how the shirt sits on your frame and prevents tightness in the yoke.
Beyond these core numbers, other key measurements influence fit and drape. Waist and hip measurements help control how a shirt tapers or balances with your torso, while back length and sleeve length define how the shirt sits when you move. By documenting chest, waist, shoulder, back length, and sleeve data, you can compare patterns or tailors’ drafts to achieve a consistently flattering silhouette.
Translating Your Measurements into a Pattern and Fit
Once you’ve captured essential measurements, translate them into a pattern or a detailed spec sheet for your tailor or shirt maker. In Measuring and Fitting Custom Shirts, most people work with a few basic fit options: classic/regular for comfort, modern/slim for a tailored look, and relaxed/boxy for ease. Your chosen fit determines how much ease to add at the chest, waist, sleeve, and back and guides subsequent alterations.
Creating a clear spec sheet helps ensure your measurements translate into a garment that drapes as intended. Include neck, chest, waist, hip, shoulder width, back length, sleeve length, and cuff preferences, along with desired hem style and shirt length. By documenting your expectations and selecting a solid shirt fitting guide, you’ll streamline communication with your tailor and improve the odds of achieving a true perfect shirt fit.
Common Fitting Issues and Quick Fixes
Even with precise custom shirt measurements, you may encounter familiar fit issues. Gaping at the chest can indicate too much width or insufficient shaping, while tight shoulders or upper sleeves can restrict motion. If the shirt rides up at the back when you bend, the back length or drape may need adjustment. These problems are common and solvable with targeted tweaks.
Pro tips for addressing these issues include adding darts or adjusting side seams to reduce chest gape, increasing shoulder width or sleeve ease for a more comfortable range of motion, and tweaking back length to improve drape. For persistent fit challenges, consider shirt alterations for custom shirts—back darts, gussets, or shoulder adjustments can dramatically change the silhouette while preserving aesthetics and comfort.
Alterations, Tailoring, and Long-Term Fit Management
Alterations are a practical path to a perfect shirt fit when ready-to-wear numbers don’t tell the full story of your body. Typical changes include taking in or letting out side seams, shortening or lengthening sleeves, and refining shoulder seams. The cost and feasibility depend on fabric, shirt style, and the extent of change, so working with a skilled tailor or patternmaker helps you optimize the result while maintaining the garment’s look.
Pro tips for long-term accuracy emphasize keeping a measuring log, re-measuring after weight or seasonal changes, and scheduling periodic fittings if you consistently buy custom shirts. Exploring digital measuring tools and body-scanning options can streamline accuracy, making it easier to reproduce a perfect shirt fit across multiple shirts and fabrics.
Frequently Asked Questions
What is measuring and fitting custom shirts, and how does a shirt fitting guide help?
Measuring and fitting custom shirts is the process of capturing precise custom shirt measurements and applying a shirt fitting guide to build a garment that drapes and moves with you. It improves consistency, reduces post-purchase alterations, and ensures a balanced silhouette from collar to hem.
How to measure for a tailored shirt?
Follow the steps in measuring for a tailored shirt: neck, chest, waist, hip (optional), shoulder width, back length, sleeve length and bicep, cuff, and shirt length, using a soft tape and recording in inches or centimeters as your base for custom shirt measurements.
What is the perfect shirt fit and how can I achieve it with custom shirt measurements?
The perfect shirt fit blends ease with your body lines. Choose a classic, modern, or relaxed fit, then tailor chest, waist, shoulders, and back length using your custom shirt measurements and, if needed, shirt alterations for custom shirts.
What tools do I need for measuring and fitting custom shirts, and how should I record results?
You’ll need a soft measuring tape, notepad or app, full-length mirror, and a helper if possible. Wear light clothing or measure over a fitted shirt, and consistently record your custom shirt measurements in a single unit.
How do fabric, ease, and style affect the shirt fit, and what should you do about it?
Fabric and ease influence drape and comfort. Stiffer fabrics hold shape; softer fabrics drape. Plan a modest ease for dress shirts or more ease for casual styles, and adjust your measurements and back length accordingly with your shirt fitting guide.
How often should you re-measure and consider alterations to maintain a perfect shirt fit?
Re-measure after weight changes or seasonal shifts, keep a measuring log of custom shirt measurements, and schedule periodic fittings to review and apply shirt alterations for custom shirts as needed.
| Topic | Key Points |
|---|---|
| Introduction | Measuring and Fitting Custom Shirts is the foundation of a shirt that feels designed for you. Custom shirts tailor every detail to your body and style, delivering better drape, mobility, and a polished silhouette compared to off-the-rack options. |
| Why measuring matters | Measurements guide fit; small deviations can cause pulling, riding, or bunching. The goal is to understand how numbers interact with fabric ease and silhouette, reducing post-purchase alterations and saving time. |
| What you’ll need | Soft measuring tape, notepad or smartphone for records, a full-length mirror, and someone to help if possible. Wear lightweight clothing or measure over a well-fitted shirt. Avoid bulky garments. Have a friend or tailor assist for accuracy. |
| Step-by-step measuring guide (summary) | 1) Neck/Collar: measure around base of neck with 0.5–1 inch ease 2) Chest/Bust: around fullest part, snug but not tight 3) Waist: around natural waistline 4) Hip: around fullest part (optional for longer shirts) 5) Shoulder width: across back from shoulder bone to shoulder bone 6) Back length: center back neck to desired hem 7) Sleeve length and bicep: from shoulder seam to wrist, plus bicep circumference 8) Cuff and wrist: around wrist ( snug or easy fit ) 9) Shirt length and hem style: base of neck to preferred hem length; consider hem shape |
| Translating measurements into a design | Turn measurements into a pattern or spec sheet for tailor. Include basic fit options: classic/regular, modern/slim, relaxed/boxy. The chosen fit determines ease in chest, waist, sleeve, and back and guides tailoring steps. |
| Tips and best practices for measuring | Stand relaxed and tall; use a flexible cloth tape; take multiple measurements; record in consistent units; recheck after a short break; seek a second person’s help when possible. |
| Fabric, ease, and style affect fit | Fabric choice influences drape and structure (e.g., poplin vs. broadcloth). Natural fibers change with movement and washing. Consider ease to balance fit and comfort for the intended style. |
| Common fitting issues and fixes | Chest gaping: reduce chest width or add darts. Tight shoulders/upper sleeves: increase shoulder width or sleeve ease. Tight cuffs: adjust cuff circumference. Back rides up: adjust back length or add back darts. Neck too tight: recheck neck and add collar ease. |
| Alterations and tailoring options | Alter side seams, sleeves, and shoulders; add darts or back seams for a refined silhouette. Cost and feasibility depend on fabric, style, and alteration scope; work with a skilled tailor or pattern to preserve aesthetics. |
| Pro tips for long-term accuracy | Keep a measuring log; re-measure after weight changes or seasonal shifts; schedule periodic fittings; explore digital measuring tools and body-scanning options to streamline accuracy. |