
Attach Custom Patches to your favorite garments with a reliable, creative approach that elevates everyday wear. This guide breaks down the three main patch attachment methods—iron-on patches, sew-on patches, and heat-seal patches—so you can pick the best fit for your fabric and lifestyle. Along the way, you’ll find practical DIY patch application tips that help patches stay vibrant through washes and wear. Whether you’re updating a denim jacket, backpack, or hoodie, selecting the right method balances speed, durability, and finish. By understanding prep, proper adhesion, and post-application care, you’ll enjoy a clean, professional result that looks great for the long haul.
Think of it in terms of fabric embellishments, badge overlays, or adhesive-backed emblems, all referring to the same goal of secure decoration. You can also describe the process as patch mounting, garment customization, or sewing versus heat-activated adornment, which aligns with common search queries. This LSI-informed framing introduces related concepts like fabric patches, backing materials, and care considerations, showing how different terms point to the same practical techniques. Whether you prefer quick, machine-assisted options or handmade stitching, the underlying principles of adhesion, alignment, and wash durability remain the same.
Iron-On Patches: Quick, Clean Results for Everyday Fabrics
Iron-on patches are popular for quick, tool-free application. They use a heat-activated adhesive on the back that bonds to fabric when heated with an iron. This patch attachment method is ideal for smooth, sturdy fabrics like denim, twill, canvas, and cotton blends, delivering a smooth, low-profile finish. For DIY patch application tips, prep the fabric, use a press cloth, and avoid steam.
On stretchy knits or high-friction zones, iron-on patches may peel over time. To improve durability, test a small area, choose patches with strong backing, preheat, apply firm pressure, and follow the patch’s heat guidelines. If you need a longer-lasting bond on garments with movement, consider alternative patch attachment methods such as sew-on or heat-seal.
Sew-On Patches: Durability for High-Wear Fabrics and Flexible Materials
Sew-on patches rely on thread to secure the patch to the fabric, offering durability in high-wear zones and on stretchy materials where heat-based methods might fail. This patch attachment method works on nearly any fabric, including knits, leather, and canvas. The trade-off is more time and the need for basic stitching skills or a sewing machine.
A tight edge finish and proper stitching (backstitch, running stitch, or tight zigzag) help resist washing and abrasion. Stabilizers can reduce puckering on lightweight fabrics. Regular care includes turning garments inside out and following care labels.
Heat-Seal Patches: Balancing Speed and Strength on Heavy Fabrics
Heat-seal patches combine heat-activated adhesive with a heat-sealing process that yields a robust bond. They’re favored in workwear and performance gear because they blend speed with durability. This patch attachment method can perform well on heavier fabrics and coated textiles, but requires precise temperature, pressure, and timing.
A proper setup—temperature control, press cloth, and approved timing—delivers a bond that resists peeling, washing, and abrasion when applied correctly. Always follow manufacturer instructions and test on scraps to dial in heat and pressure.
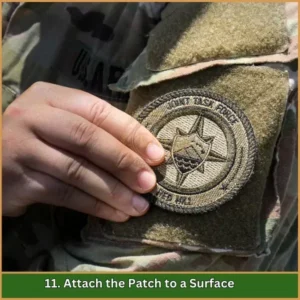
Attach Custom Patches: Best Practices for Long-Lasting Bonds
Attach Custom Patches effectively by choosing the right method for your fabric, aligning patches with seams, and performing careful prep. Pre-wash fabrics when possible, clean surfaces, and use alignment cues to ensure a professional finish. This approach uses the full spectrum of patch attachment methods and emphasizes patience and precision as part of DIY patch application tips.
Testing the bond on similar fabric and laundering cycles helps catch issues before they become problems. If a patch lifts, reapply heat or sew around the edges for extra security. A well-executed application keeps colors vibrant and edges neat for long-term wear.
Choosing the Right Patch Attachment Method by Fabric Type
Fabric type guides your choice: iron-on patches often work well on cotton, denim, and canvas; sew-on patches excel on knits, leather, and fluffy textures; heat-seal patches suit workwear, coated textiles, and high-sweat environments.
If unsure, test on fabric scraps and refer to care labels. A combination approach—backing, stabilizers, or edge stitching—can extend life. This decision is part of the broader patch attachment methods strategy.
DIY patch application tips for longevity and aesthetics
This final section emphasizes practical DIY patch application tips to maximize longevity and aesthetics. Start with fabric prep, consider backing or stabilizers, and choose a backing appropriate to the garment. Whether you pick iron-on patches, sew-on patches, or heat-seal patches, plan your design with alignment lines to ensure a polished look.
Carefully manage heat, pressure, and timing; test on scraps; and launder with gentle cycles to preserve color and adhesion. Regularly inspect patches and re-apply heat if necessary, using the patch manufacturer’s guidelines to keep patches sturdy and vibrant.
Frequently Asked Questions
What are the best patch attachment methods to consider when you Attach Custom Patches on different fabrics?
When you Attach Custom Patches, the main patch attachment methods to choose from are iron-on, sew-on, and heat-seal. Iron-on patches provide a quick, low-profile finish on denim, canvas, and cotton blends but can peel on stretchy knits. Sew-on patches offer durable security on knits and high-wear areas, though they require stitching. Heat-seal patches balance speed and durability on heavier fabrics when applied correctly. Always test on a scrap fabric first and choose the method that matches the fabric and wear conditions.
How do iron-on patches perform when you Attach Custom Patches to denim versus knits?
Iron-on patches work well for Attach Custom Patches on denim and other sturdy fabrics, delivering a fast and smooth bond. On knits or stretchy fabrics, adhesion can be less reliable and may peel with movement or washing, so consider reinforcing with sewing or choosing a heat-seal option. Always test heat settings on an inconspicuous area and use a pressing cloth to protect fabric.
What are DIY patch application tips for sew-on patches to stay secure when you Attach Custom Patches?
For sew-on patches in the DIY patch application process, mark the placement, pin the patch flat, and sew around the edges with a tight backstitch or small zigzag stitch. Use a matching thread and keep stitches close to the edge to reduce fraying. Finish with a secure knot, trim excess thread, and press lightly to flatten the stitches. Wash on gentle cycles to extend longevity.
What steps are needed for a reliable heat-seal patch application when you Attach Custom Patches to workwear?
For heat-seal patches, position the patch, cover with a press cloth, and apply heat and pressure exactly per the patch instructions. If using a household iron, apply steady pressure for the recommended time (often 15–40 seconds) without steam. Allow to cool, test the bond, and reapply heat if needed. A proper heat-seal setup delivers a durable bond on heavier fabrics when done correctly.
What fabric prep is essential before you Attach Custom Patches, including pre-wash and surface prep?
Essential prep includes pre-washing the garment (unless the care label says otherwise), cleaning the surface, and ensuring it is lint-free. For rough or fuzzy fabrics, use stabilizers or a backing to prevent shifting. Dry, flat surfaces help with alignment, and testing on a scrap area helps anticipate adhesion success for your chosen patch attachment method.
What common mistakes should I avoid with patch attachment methods to ensure long-lasting results when you Attach Custom Patches?
Common mistakes include rushing the bond, skipping surface prep, and misaligning patches. Also, choosing the wrong method for the fabric (e.g., using iron-on on highly stretchy areas) can lead to peeling. Avoid these by thorough fabric prep, accurate alignment, testing adhesion on scraps, and following the patch manufacturer’s instructions for temperature, pressure, and timing.
| Topic | Iron-On Patches | Sew-On Patches | Heat-Seal Patches |
|---|---|---|---|
| What it is | Heat-activated adhesive on the back; bonds to fabric when heated with an iron. | Attachment by stitching; durable on most fabrics. | Combined heat-activated adhesive with a heat-sealing process for a robust bond. |
| Best fabrics | Smooth, sturdy fabrics like denim, twill, canvas, and cotton blends. | Nearly any fabric, including knits, leather, and canvas. | Heavier fabrics and coated textiles; precise temperature and pressure are important. |
| Pros | Fast, tool-free, low-profile finish. | Durable in high-wear areas; works on stretchy fabrics. | Balances speed and durability; strong bond when applied correctly. |
| Cons | Potential peeling on stretchy or high-movement areas. | Time-consuming; requires stitching; edges can be visible if not done well. | Requires correct temperature and pressure; needs setup and care. |
| Typical uses | Denim, casual wear, lightweight jackets. | High-wear zones, knits, leather, canvas. | Workwear and heavier fabrics. |
| Tools & Prep | Iron, parchment paper or cloth, flat ironing surface, temperature control. | Needle, matching thread, scissors; optional sewing machine. | Heat press or iron with a press cloth; follow patch instructions for temp and pressure. |
| Step-by-step (overview) | Position patch; cover with cloth; heat for 15–30 seconds; test adhesion. | Position patch; pin; backstitch or zigzag around edge. | Position patch; cover with press cloth; apply heat/pressure per instructions. |
| Tips & Pitfalls | Test on scraps; avoid steam; align with seams. | Edge stitching; avoid puckering; consider backing or stabilizer. | Follow manufacturer specs; test bond; let cool and check adhesion. |
Summary
Attach Custom Patches is a practical craft that lets you personalize garments while extending their life. This guide compares iron-on, sew-on, and heat-seal options, highlighting suitable fabrics, benefits, and limitations, so you can pick the best method for your project and fabric type. By prepping the garment, aligning patches carefully, and following manufacturer guidelines, you can Attach Custom Patches with confidence for durable, professional-looking results.