
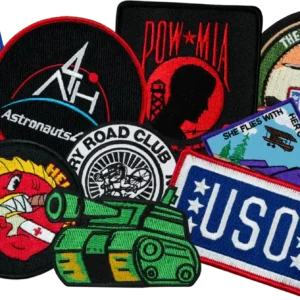
Custom Embroidered Design Patches offer a stylish way to personalize clothing, backpacks, and accessories. They provide a tangible, durable means to showcase logos, quotes, characters, or artwork while adding texture and color to fabric, and they pair well with DIY clothing patches and embroidered patch design concepts. If you’re exploring ways to upgrade your wardrobe, this guide introduces essential materials, design steps, sewing methods, and care for patch application on fabric. With attention to edge finishes like merrowed edge patches and stitching styles such as satin stitch embroidery, you’ll achieve durability and a polished look. By following these tips, you’ll learn to create patches that stand up to wear and washing while keeping your projects looking fresh.
In other words, these personalized embroidery patches offer a flexible way to brand, badge, or decorate garments and bags. Think of them as stitched emblems, fabric badges, or sewn identifiers that can be attached with iron-on, sew-on, or hook-and-loop backings. The concept translates well for DIY fashion projects and small collections, focusing on durability, colorfast stitching, and easy customization. LSI-friendly terms such as embroidered patch design, patch application on fabric, and merrowed edge patches reinforce the core idea of a high-quality, stylish embellishment.
Custom Embroidered Design Patches: Design Fundamentals for DIY Projects
Custom Embroidered Design Patches offer a tangible way to translate ideas into wearable art. In embroidery terms, a strong patch design relies on high-contrast elements, clean lines, and scalable details that hold up when reduced to 2–4 inches.
From concept to execution, this is where the embroidered patch design comes to life. Consider your intended use, color choices, and shape so the patch communicates clearly on fabrics like denim, canvas, or knitwear — turning simple DIY clothing patches into statement accents.
DIY Clothing Patches: Materials and Tools to Get Started
Creating patches begins with the right materials and tools. Gather a sturdy fabric base such as twill, felt, or canvas, along with stabilizers to prevent puckering and ensure stitch integrity. Choose embroidery thread, a suitable needle, and a hoop or stabilizer depending on your workflow.
Edge finishing options and backing choices influence how your patch wears. Merrowed edge patches and satin stitch borders deliver durability and a polished look, while iron-on or sew-on backing options offer flexible attachment for DIY clothing patches.
Embroidery Techniques for Quality Patches: Satin Stitch, Backstitch, and More
Mastering stitch types is key to a professional result. Satin stitch embroidery provides solid color fills and crisp outlines, while backstitch and long-and-short stitches add texture and shading without overloading the fabric.
Whether you stitch by hand or machine, practicing on swatches helps you dial in stitch density, tension, and edge coverage. This applies especially when scaling designs for smaller patch footprints used in DIY clothing patches.
Edge Finishes and Backing Options: Merrowed Edges and Beyond
Edge finishing shapes the patch’s durability and appearance. A merrowed edge uses a tight overlock stitch around the border for a durable, finished look that resists fraying, while satin stitch borders offer a neater, more compact line.
Backings determine how patches attach to fabric. Iron-on backings are convenient for quick DIY projects, sew-on backs provide security for garments that endure washing, and Velcro-backed patches enable interchangeable patches on jackets and bags.
Attaching and Applying Patches: Patch Application on Fabric
Placement is critical for a polished result. Position patches away from seams and high-mressure areas, then stabilize the garment to prevent puckering during sewing.
When attaching, follow backing instructions: sew-on patches take a zigzag or satin stitch around the border for durability, while iron-on patches require heat and time per the backing. Care for the garment afterwards to prolong patch life.
Care, Maintenance, and Troubleshooting for Patches
Proper care keeps Custom Embroidered Design Patches vibrant. Wash on gentle cycles with mild detergent, avoid high heat, and air-dry whenever possible to protect stitches and colors.
Common issues like puckering, loose edges, or color bleed can be addressed by stabilizing the fabric, increasing edge stitch density, testing colorfastness, and performing timely re-stitching as needed.
Frequently Asked Questions
What exactly are Custom Embroidered Design Patches, and why are they popular for DIY clothing patches?
Custom Embroidered Design Patches are decorative fabric pieces with an embroidered design that you attach to clothing, backpacks, or accessories. They add texture, color, and personality by showcasing logos, quotes, characters, or artwork, and they’re durable enough for daily wear. For DIY clothing patches, plan for a sturdy fabric base, reliable edge finishes such as merrowed edges or satin borders, and a backing that can withstand washing.
How do I choose the right materials for an embroidered patch design?
Choose a sturdy base fabric such as twill, felt, or canvas. Pair it with an appropriate stabilizer (washaway, cutaway, or tear-away) and high-quality embroidery threads. Decide on a backing (iron-on, sew-on, or Velcro) and select edge finishes—merrowed edge patches for durability or satin stitch borders for a cleaner look—based on how the patch will be worn.
What is the difference between hand embroidery and machine embroidery for patch applications on fabric in Custom Embroidered Design Patches, and which should I choose for DIY projects?
Hand embroidery offers a tactile, artisanal look and is ideal for small runs or one-off patches, while machine embroidery provides speed and consistent results for larger quantities. Machine embroidery requires digitizing the design and testing on fabric swatches; hand embroidery requires careful tension and patience. For DIY projects, start with machine embroidery to learn the workflow, and try hand embroidery for unique texture on selective designs.
What are merrowed edge patches and satin stitch embroidery, and when should you use each for your embroidered patch design?
Merrowed edge patches feature a tight overlock stitch around the border, producing a durable and finished edge. Satin stitch embroidery creates a dense border or filled areas with smooth, even stitches. Use merrowed edges when you expect frequent washing or abrasion; choose satin stitch borders for a compact, vintage, or bold look.
How do I apply patches to fabric to ensure a durable patch application on fabric?
Place the patch where it will not be stressed by seams or bending. Stabilize the fabric underneath, especially for knits, to prevent puckering. Attach with a sew-on zigzag or satin stitch, or follow the backing instructions for iron-on patches. Finish with a gentle wash to ensure the stitching holds.
How should I care for Custom Embroidered Design Patches to keep DIY clothing patches looking fresh through washes?
Care patches by washing on a gentle cycle with mild detergent and avoiding high heat in the dryer; air-dry when possible. Regularly inspect for loose threads and re-stitch as needed to maintain wear resistance. Test colorfastness on a scrap fabric before washing patches on other garments and follow garment care guidelines.
| Topic | Key Points |
|---|---|
| Introduction | Patches personalize clothing; durable way to showcase logos, quotes, artwork; adds texture and color; guide covers materials, design, sewing, care; aims for high-quality patches that withstand wear and washing. |
| Materials and Tools You Need | Fabric base (twill, felt, canvas); Stabilizers (washaway/cutaway/tear-away); Embroidery thread (polyester or rayon); Needle and hoop; Backing options (iron-on, sew-on, Velcro); Edge finishing (merrowed edge, satin stitch); Optional design tools (fabric pen, transfer paper, digitizing software) |
| Design and Planning for Your Patch | Define purpose; Choose size/shape; Create vector or detailed sketch; Color strategy; Plan stitch types; Backing and edge decisions; Planning saves time and ensures consistency. |
| Creating Patches: Hand Embroidery vs Machine Embroidery | Two main methods; Hand embroidery offers artisanal look, texture, good for small runs; Machine embroidery is fastest and most consistent for larger quantities; Both require testing and appropriate files or skills. |
| Edge Finishing and Backing Options | Merrow edge for a finished, durable border; Satin stitch borders for dense lines; Folded edge as softer option; Backings: iron-on, sew-on, or Velcro; Durability depends on edge/backing choice. |
| Attaching Custom Embroidered Design Patches to Clothing | Plan placement away from seams; Stabilize fabric; Attach with zigzag/satin stitch for sew-on patches; follow backing instructions for iron-on; care: turn inside out, gentle wash. |
| Design Ideas, Trends, and Applications | Logos/club badges, character motifs, quotes/monograms, decorative patches; Experiment with color, scale, shapes; Trend: bold, high-contrast colors on solid fabrics; versatile across garments. |
| Care, Maintenance, and Troubleshooting | Wash on gentle cycles; air-dry when possible; inspect for loose threads; Puckering: add stabilizer; Loose edges: increase density or merrow; Color bleed: test colorfastness. |
| Conclusion (base content) | Custom Embroidered Design Patches offer a durable, expressive way to personalize textiles; success depends on thoughtful design, quality stitching, and proper attachment. |
Summary
The table above condenses the base content into key points across major sections, highlighting materials, design planning, embroidery methods, finishing, attachment, trends, care, and a concluding takeaway.