
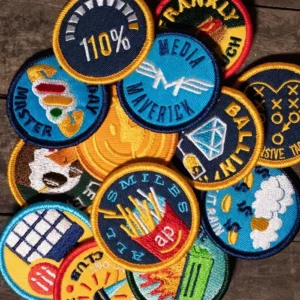
Custom Patches have become a versatile symbol of branding and identity across fashion, sports teams, clubs, and hobby projects. They blend art and craftsmanship, turning a simple shape into a durable badge of character. Whether you are creating embroidery patches for a clothing line or DIY patches for a jacket, mastering patch embroidery techniques is essential for a premium result. This concise guide highlights what makes patches stand out, from backing options to fabric choices that affect wear. With careful planning, your patch project can achieve professional edge and lasting appeal.
In other terms, these stitched emblems serve as compact branding signals added to apparel. They can be described as fabric patches, sew-on patches, or decorative insignias that convey identity at a glance. The broader field covers woven or printed patches, iron-on patches, and various backings that influence application. Using Latent Semantic Indexing principles, terms like embroidery, badge, and textile motif are linked to related topics to help readers and search engines understand context. Ultimately, the goal is a durable, legible mark that enhances a product’s look and identity.
Design foundations for Custom Patches: concept, size, and color strategy
Custom Patches start with a clear concept that conveys branding, storytelling, or team identity. In the design phase, you determine what message the patch should communicate, how it will appear on different garments, and how the patch’s shape and size impact legibility. A strong concept guides color choices, typography, and composition, ensuring the final patch reads well from a distance and complements the fabric it sits on.
Color strategy is essential to a premium patch. Selecting thread colors that align with a brand palette helps maintain consistency across embroidery patches and other branding materials. When working with patch embroidery techniques, contrast and edge definition matter, especially on darker fabrics or busy prints. This is where the integration of embroidery patches with fabric patches can deliver a versatile look for jackets, jerseys, or bags.
Choosing between embroidery patches and fabric patches for optimal branding
Two core patch families drive most projects: embroidery patches and fabric patches. Embroidery patches rely on stitched designs sewn onto a backing, delivering vivid color, texture, and durability. Fabric patches use woven or printed fabrics as the patch surface, sometimes with embroidery around the edges for reinforcement. Each type brings distinct benefits for branding and cost efficiency.
Embroidery patches tend to be more flexible for complex logos, gradients, and durable wear, while fabric patches can be more economical for large runs and can incorporate pre-printed motifs. When selecting fabrics, consider the garment’s care instructions, weight, and how the patch will perform in its environment. For outerwear or heavy garments, sturdy backings like twill can improve longevity, whereas athletic wear might benefit from lighter stabilizers to keep patches flat during washing.
Mastering patch embroidery techniques for durable, vibrant results
The heart of a patch is its stitching. Mastering patch embroidery techniques such as satin stitch for bold, glossy fills, and fill stitches for large color blocks, creates crisp edges and vibrant color blocks. Running stitches outline shapes with minimal bulk, while appliqué layers fabric pieces beneath embroidery to add texture and depth. These techniques combine to shape the patch’s overall look and feel.
Edge finishing and thread color management elevate readability and durability. Merrow borders offer a strong, professional edge, while satin-edge finishes can produce a softer silhouette. Color management—ensuring high-contrast threads and proper digitizing alignment—helps patches read clearly on various fabrics and backgrounds. The interplay between stitches and backing material determines how well the design holds up in daily wear.
Backing, finishing, and durability options for long-lasting patches
Backing choice dictates how patches attach and withstand repeated laundering. Common backings include iron-on adhesive, heat-activated fusible backing, and sew-on backing. Iron-on patches provide quick, tool-free placement but require careful heat control to avoid scorching and may be less durable in high-wear settings. Sew-on patches rely on stitching for longevity and can be more durable across many wash cycles.
Non-woven materials and stabilizers influence shape retention and edge quality. Cut-away stabilizers help maintain form for detailed interiors, while tear-away stabilizers suit simpler designs. The combination of backing, stabilizer, and fabric type affects how patches perform in different environments, from sports uniforms to fashion jackets, ensuring clean edges and lasting adhesion.
Production workflow: digitizing, setup, and color management for patches
Production starts with digitizing artwork into a stitch file that machines can read. A skilled digitizer interprets line weight, color changes, and fabric behavior to produce consistent results across batches. Key steps include color mapping to Pantone or brand-specific colors, stabilizer selection based on fabric and patch size, and a test sew on a similar material to verify density, pull, and edge finish.
Efficient production also means optimizing stitch count and ensuring edge fidelity. Reducing unnecessary stitches helps control costs without sacrificing quality. Proper digitizing aligns with the chosen backing and fabric type, whether you’re producing embroidery patches or fabric patches for a limited run or a mass release. A well-planned workflow supports repeatable results and faster turnaround.
Attachment methods and care: iron-on vs sew-on patches and care tips
Attachment choice depends on fabric compatibility and end-user care. Iron-on patches offer quick placement but rely on appropriate heat settings and fabric compatibility to avoid adhesives failing during washing. In high-usage uniforms or workwear, sew-on patches often outperform iron-on counterparts due to superior durability. Some projects use a hybrid approach—a temporary iron-on for initial placement, followed by stitched reinforcement for long-term wear.
Care instructions extend the life of patches and help maintain appearance. Advise customers to wash inside out, use cold water, and minimize tumble drying heat. Patches with metallic threads or delicate finishes may benefit from hand washing or air drying. Providing clear care guidance ensures longevity for embroidery patches and fabric patches alike, preserving color integrity and edging quality through many wash cycles.
Frequently Asked Questions
How do I choose between embroidery patches and fabric patches for Custom Patches?
Choosing between embroidery patches and fabric patches depends on appearance, durability, and cost for your Custom Patches. Embroidery patches offer vivid color, texture, and durability for branding, while fabric patches are often more cost-efficient for large runs or pre-printed motifs. Also consider backing and attachment: iron-on patches for quick placement or sew-on patches for long-term wear.
What patch embroidery techniques should I consider for Custom Patches?
Important patch embroidery techniques to evaluate include satin stitch for crisp edges, fill stitch for large color blocks, running stitch for outlines, and appliqué for multi-material textures. Effective color management and correct digitizing optimize stitch count and pull. Edge finishing options like Merrow borders provide a clean, durable edge.
What backing options work best for Custom Patches, and when should I use iron-on patches vs sew-on patches?
Backings determine attachment and wash life. Iron-on patches use heat-activated adhesive for quick placement on compatible fabrics, while sew-on patches rely on stitching for durability. Use iron-on patches for fast placement on suitable materials, but expect heat and washing effects; sew-on patches perform best on workwear and garments that are washed frequently. A hybrid approach can combine an iron-on base with sewn reinforcement.
How can I design Custom Patches for legibility and premium look across different fabrics?
Design Custom Patches with legibility in mind: keep shapes simple for small patches, choose high-contrast color schemes that align with your brand, and test on target fabrics like jerseys and denim. Edge finishing options such as a Merrow border or satin border frame the design, while ensuring small text remains readable after stitching.
What is the role of digitizing in producing Custom Patches?
Digitizing translates artwork into stitch files for Custom Patches. A skilled digitizer maps colors to brand colors, plans stabilizers, and tests on a fabric similar to production material to confirm density and edge quality, reducing stitch waste and ensuring consistent results.
How should I care for and extend the life of Custom Patches on garments?
Care for Custom Patches by following garment guidelines: wash inside out in cold water and avoid high-heat drying. Metallic threads or delicate finishes may require hand washing or air drying. Choosing patch materials and backings that match the garment’s care profile helps maintain appearance and longevity across batches.
| Topic | Key Points | Notes / Examples |
|---|---|---|
| Introduction | Custom Patches are a versatile branding and craft element across fashion, sports teams, clubs, and hobbyist projects, blending art and craftsmanship to create durable identity badges. | The guide introduces patches as wearable art, covering techniques, materials, backing, fabric choices, and practical application for premium results. |
| Design considerations for Custom Patches | Design phase sets the tone: clear concept, defined message, branding story; size and shape affect legibility; plan color strategy and contrast for readability on various fabrics; aim for clean edges and balanced composition. | Consider patch usage (jerseys, denim) and ensure the design reads well from a distance; balance complexity with practicality. |
| Choosing materials: embroidery patches vs fabric patches | Two main patch families: embroidery patches (stitched on backing) and fabric patches (woven/printed surface); each has advantages. | Embroidery patches suit complex logos and gradients; fabric patches can be more cost-efficient for large runs and may feature pre-printed motifs. Consider garment fabric, care, and environment; heavy outerwear benefits from sturdy backings, while athletic wear may use lighter stabilizers. |
| Embroidery techniques for patches | Key stitches shape the look: Satin stitch, Fill stitch (tatami), Running stitch, Appliqué; manage thread color for legibility; ensure proper digitizing alignment with stitch count; finish with edges. | Merrow borders are common for a crisp edge; satin-edge or overlock can create softer finishes; digitizing should optimize stitch count and pull. |
| Backing, finishing, and durability | Backings include iron-on, heat-activated fusible, and sew-on; each affects attachment and durability. | Iron-on offers quick placement but may require careful heat control; sew-on is durable and washable; stabilizers (cut-away/tear-away) help non-woven fabrics hold shape. |
| Production workflow: digitizing and setup | Digitizing converts artwork to stitch files; good digitizers interpret line weight, color changes, and fabric behavior. | Steps include color mapping to brand colors, stabilizer selection, test sew on similar material, and optimizing stitch count for cost and quality. |
| Fabric and edge choices for different looks | Edge finishes communicate quality: Merrow (dense overlock) vs satin border; surface can be satin-finished or matte; ensure legibility with small text and consider backing/liner to prevent fabric shadows. | Choose edge and finish to match fabric weight and desired aesthetic; test legibility on target garments. |
| Iron-on vs sew-on: selecting the best attachment method | Iron-on is convenient but depends on fabric type and laundering; sew-on is often more durable; hybrids are possible. | Consider end-user care: high heat can degrade adhesives; for high-durability uses, prefer sew-on or reinforced methods. |
| Care, washing, and longevity | Durability relies on design, materials, and attachment; provide care instructions to customers. | Recommend turning garments inside out, cold wash, low heat; metallic threads may require special care; align patch material with garment care to ensure longevity. |
| Trends and use cases for Custom Patches | Patches span fashion, sports, clubs, and DIY applications, reinforcing identity and storytelling. | Understand applications to tailor patch style, backing, and attachment for desired audience and longevity. |
Summary
Conclusion: Custom Patches are a versatile branding and storytelling tool across fashion, sports teams, clubs, and hobbyists. By balancing design considerations with embroidery techniques, fabric selection, edge finishes, and attachment methods, you can produce patches that look great, perform reliably, and stand up to daily wear. Whether crafting embroidery patches with bold satin stitches or exploring fabric patches with woven backing, the path to high-quality patches lies in thoughtful planning, skilled stitching, and careful finishing. Embrace the process, experiment with materials, and let your patches carry your message with clarity and durability.