
DIY patches have exploded in popularity as a fun, practical way to breathe new life into old clothes and make a personal fashion statement. From repairing wear and tear to curating a fearless wardrobe, patches for clothing offer quick, durable upgrades that tell your story. Whether you want to learn how to sew patches on clothes or follow a fabric patches tutorial, this guide shows you step by step how to attach them securely. With an eye toward personalization, you can personalize wardrobe with patches by selecting designs that reflect your interests and values. If you’re aiming to source reliable, custom patches clothing options, this practical project helps you assemble a distinctive look without sacrificing style or comfort.
Beyond traditional patches, you can think of fabric embellishments like removable adornments that refresh your closet without a full revamp. Options include embroidered badges, woven motifs, appliques, or felt accents, which let you repair, customize, or illustrate your style. This approach aligns with upcycling and slow fashion, turning worn garments into conversation starters through thoughtful placement and color coordination. Whether you call them patches, badges, appliques, or fabric embellishments, the core idea remains: durable, flexible decorations that personalize clothing while keeping care routines simple.
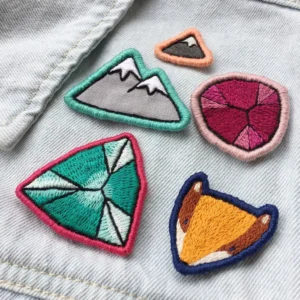
DIY Patches: Transform Your Wardrobe with Custom Patches Clothing
DIY patches empower you to refresh old garments and tell your personal story through clothing. By choosing patches for clothing that reflect your interests—from vintage logos to floral embroidery—you create a durable, wearable statement piece. The process is approachable for crafters of all levels, and the results can feel truly uniquely yours while promoting upcycling over disposal.
Getting started is as simple as gathering a curated collection of patches and selecting a garment with a suitable surface. Consider the base color and fabric type to guide your patch choices, and plan a layout that balances color and texture. This approach helps you personalize wardrobe with patches in a way that aligns with your style, while appreciating the idea of custom patches clothing that can be moved or updated as your tastes evolve.
Patches for Clothing: A Quick Guide to Selection and Placement
Choosing patches for clothing involves weighing fabric type, patch material, and the garment’s overall look. Embroidered and woven patches offer durability, while fabric appliques can add layered texture for a playful or vintage vibe. A little planning around color harmony and scale will help you build a cohesive patching project that feels intentional.
Placement matters as much as the patches themselves. Try a centered, symmetrical arrangement for a retro vibe, or create a collage across pockets and seams to tell a story with small, interconnected symbols. For durable fabrics like denim or canvas, you have more flexibility with bold, dense patches, while lighter fabrics may benefit from stabilization beforehand to ensure a clean finish.
How to Sew Patches on Clothes: Methods, Tools, and Best Practices
There are two reliable ways to attach patches: iron-on patches for speed and sew-on patches for long-lasting wear. Iron-on patches are convenient on sturdy fabrics and work best with a clean surface, while sew-on patches provide durability across different fabrics and are less dependent on heat.
Equipping yourself with the right tools—scissors, pins, a fabric marker, a needle and thread, and optionally a sewing machine or embroidery hoop—sets you up for success. Whether you’re pillow-fighting through a denim jacket or mending a beloved hoodie, understanding how to sew patches on clothes gives you greater control over the final look and lifespan of your patchwork.
Step-by-Step Tutorials to Personalize Wardrobe with Patches
Tutorial-based learning makes the patching journey approachable. Start with a denim jacket or a backpack and plan a layout that centers a larger patch with supporting accents. This practical approach helps you see how fabric patches tutorial-style projects come together, building confidence as you attach more patches.
As you gain experience, you can experiment with elbow patches, knee reinforcements, or a patch collage along a sleeve. Each project expands your toolkit and reinforces the idea of personalize wardrobe with patches as a core concept—turning ordinary garments into customized, durable pieces that express who you are.
Creative Patch Layouts: Designing a Patch Gallery on Clothes
Patching is a form of wearable art. Layer embroidered patches, woven patches, and fabric appliques to create a visually rich patch gallery on jackets, jeans, or bags. Think about balance and repetition as you arrange shapes and colors to build a cohesive narrative across the garment.
Beyond aesthetics, creative layouts also address practicality. Position patches to reinforce high-wear areas like elbows or knees, or create a focal point with a bold central patch surrounded by smaller accents. This approach supports a distinctive style while keeping patches for clothing functional and durable in daily use.
Care and Maintenance for Patched Garments to Maximize Longevity
Patched garments benefit from gentle handling in daily wear. Wash on a cold, gentle cycle and avoid high-heat drying to protect both the fabric and the patch edges. Turning the garment inside out minimizes abrasion and helps preserve colors and stitching over time.
If you notice any lifting, re-sew the edge or apply a touch of fabric glue under the border for extra security. Storing patched items out of direct sunlight keeps colors vibrant, and periodic checks of patches—especially after washing—help you catch loose threads early, ensuring your DIY patches remain securely in place for the long term.
Frequently Asked Questions
DIY patches: how do I choose patches for clothing, and what materials work best for beginners using patches for clothing projects?
Key picks for patches for clothing begin with the garment type and fabric weight. For denim or canvas, opt for durable patches and consider both iron-on and sew-on options. Choose color harmony and a cohesive theme to suit your wardrobe. Start with a mix of shapes and sizes, test placement with pins, and select patches with compatible backing (adhesive for iron-on or fabric for sewing). Remember, this is a DIY patches project—practice on a scrap first and build your toolkit as you go.
How to sew patches on clothes: what tools and steps do I need?
Essential steps: gather patches for clothing, a clean fabric surface, scissors, pins, and thread. Decide on iron-on or sew-on; for sew-on, have a needle or sewing machine and matching thread. Place patches, baste with pins, and stitch around the edges using a tight satin stitch or zigzag. For iron-on, cover with a cloth and press per patch instructions. Finish by trimming threads and washing on a gentle cycle to set the stitches.
What is a fabric patches tutorial for personalizing wardrobe with patches, and where should I start?
A fabric patches tutorial starts with gathering a patch collection and selecting a garment. Plan a layout, then fix patches temporarily with pins or a light adhesive. Choose either iron-on or sew-on methods, apply accordingly, and add finishing stitches or top-stitching to secure edges. Stabilize lightweight fabrics if needed. This approach helps you personalize wardrobe with patches while keeping the process approachable for crafters at all levels.
Can I use custom patches clothing on a denim jacket, and how do iron-on vs sew-on methods compare when using DIY patches?
Yes, you can use custom patches clothing on a denim jacket. Iron-on patches offer quick results on sturdy fabrics, but sew-on patches provide longer-lasting durability, especially on areas with movement. For denim, you can start with iron-on for speed, then reinforce the edges with a few hand stitches or top-stitching. Always use a pressing cloth and moderate heat for iron-ons, and consider a seam or zigzag stitch around the border for added security.
What are care tips for patched garments (patches for clothing) after completing a DIY patches project?
Care tips: wash patched garments on a gentle cycle in cold water and air dry or tumble dry low. Turn the item inside out to protect edges, and re-sew any edges that begin to lift. If patches start lifting, apply a small amount of fabric glue under the border or resew with a secure stitch. Store patched items away from direct sunlight to prevent fading.
How can I personalize wardrobe with patches to create a cohesive look across my outfits?
Start with a neutral base and plan a color-coordinated patch layout. Use larger patches as anchors and add smaller accents to balance the look. Mix textures (embroidery, woven, fabric appliques) but maintain a consistent theme or color palette so patches feel cohesive. Rotate patches seasonally and keep a small, curated set to evolve your personalized wardrobe with patches over time.
| Topic | Key Points | Details |
|---|---|---|
| Why patches matter | Personalization; sustainability; upcycling; removable/reusable | Patches reflect interests and enable experimentation with placement, color, and textures; they refresh garments while reducing waste. |
| Getting started: what you’ll need | Essential tools and materials | Patches; clean fabric surface; scissors, pins, and fabric marker; sewing supplies (needle, thread, thimble, seam ripper); embroidery hoop and sewing machine; iron and pressing cloth; stabilizer; organized workspace. |
| Patch types and placement ideas | Variety of patches and layouts | Embroidered, woven patches, and fabric appliques. Placement ideas: centered patches on jackets, collage on pockets, elbow patches for durability, spell-out initials, focus centerpiece with accents. Consider color harmony and fabric base. |
| How to sew patches on clothes: the basics | Iron-on vs Sew-on | Iron-on: heat-activated adhesive; quick and beginner-friendly on sturdy fabrics. Sew-on: durable, suitable for all fabrics; hand-stitch or machine stitch. |
| Step-by-step tutorials to personalize your wardrobe | Four guided tutorials | Tutorial 1: Patch a denim jacket with a patch collage. Tutorial 2: Elbow patches on a hoodie. Tutorial 3: Jeans knees with reinforced patches. Tutorial 4: Patches on a backpack or tote bag. |
| Advanced techniques and tips | Techniques and considerations | Fusible web and heat adhesives, satin stitch borders, backstitch or running stitch, color coordination, layering patches, finishing touches with a pressed seam. |
| Care and maintenance for patched garments | Washing care and longevity | Gentle cold-water wash, avoid high heat; turn inside out; re-sew if edges lift; store away from direct sunlight. |
| Creative ideas and beyond | Beyond clothing | Patches for backpacks, tote bags, denim vests, or shoes; seasonal themes; mix textures; self-expression. |
| Final thoughts: your patch-making journey | Accessibility; budget-friendly; practice | DIY patches offer an approachable path to personalized, sustainable style. Start simple, practice, and gradually expand your toolkit to craft a wardrobe that reflects your values and tastes. |
Summary
DIY patches empower you to transform fabrics into personalized, durable items. DIY patches combine creativity with sustainable fashion, turning worn garments into conversation-worthy pieces. By selecting patches that reflect your interests and using versatile attachment methods—iron-on or sew-on—you can tailor each piece while reducing waste. Start with a small project, master basic placement and stitching, and gradually build a signature wardrobe that feels uniquely yours. Whether you’re refreshing a favorite tee or reimagining a jacket, DIY patches offer an accessible path to expressive, lasting style.