
Patches for Beginners offer a simple way to personalize fabrics and rejuvenate favorite jackets while building a foundational sewing skill. If youve ever thought, I could do that, this guide is perfect for sew-on patches for beginners. This guide covers common questions like how to sew on patches, with a beginner-friendly tone and a step-by-step patch tutorial you can try today. From choosing patches that fit your style to positioning and simple stitches, youll gain confidence with beginner patch sewing as a core skill. With dedicated practice, patch sewing on denim or other sturdy fabrics becomes a smooth, satisfying skill.
Viewed through a broader lens, this topic can be explored as starter patch projects that blend creativity with practical sewing practice. From the perspective of LSI, terms like beginner-friendly garment embellishments, entry-level applique patches, and simple sewing tasks help connect related ideas. You will learn to plan layouts, protect the fabric beneath, and finish edges with durable stitches, core skills shared by many surface-decorating techniques. Whether you call it patching a denim jacket or adding decorative patches to a tote, the underlying concepts remain approachable and repeatable, inviting steady progress.
Patches for Beginners: Quick-start Patch Tutorial
Starting your patch journey doesn’t require perfection. This quick-start guide helps you learn how to sew on patches with a simple technique you can complete today. If you’re asking how to sew on patches, you’re in the right place; a beginner-friendly approach focuses on alignment, simple stitches, and forgiving edges. With a few basic tools—a needle, thread, pins, and an iron—you can transform a jacket or bag in an afternoon.
By following a step-by-step patch tutorial, you’ll gain confidence as you practice patch sewing on denim or sturdy fabrics. We’ll cover planning the layout, choosing patches that sit flat, and securing them so you can proceed to sew without panic. Remember, sew-on patches for beginners are about visible results and steady progress, not studio-grade artistry from day one.
Finally, consider the difference between hand-stitching and machine stitching. For denim or canvas, a zigzag edge is durable and forgiving for beginners, while a backstitch can create a nearly invisible seam on lighter fabrics. Denim patching is a forgiving starting point, making this a great pathway for patch sewing on denim.
Choosing Patches That Fit Your Denim and Canvas: Layout, Theme, and Edges
Selecting patches is as important as the stitches you use. For denim and sturdy fabrics, patches with clean edges and sturdy backing tend to hold up under washing. Think about a cohesive theme—nature, travel, music—or mix a few motifs for a collage look. If you’re new to patch sewing on denim, start with two medium-sized patches rather than a dozen tiny ones to learn how to balance weight and placement. This is also a smart entry point for beginner patch sewing.
Lay patches out on a flat surface to visualize the final design, then map your layout with tape or a washable marker. This step keeps you from over-pinning and offers practice with your step-by-step patch tutorial before you start stitching. The goal is a laid-out design that feels intentional and easy to sew, even if you’re still mastering edge finishes.
Tip: consider patches with a woven edge for durability on denim, and remember that you can adjust edge finishes later. You’ll find that patch sewing on denim responds well to a light stabilizer under the area to prevent stretch during stitching. This approach helps reduce puckering and keeps your final look neat, especially for beginner patch sewing.
Hand-Stitch vs Machine Stitch: How to Decide for Sew-On Patches
Both hand-stitching and machine stitching work well for patches, and choosing between them is part of the beginner patch sewing journey. Hand-stitching gives you more control on curves and tight spots, while a machine offers speed and uniformity for multiple patches. If you’re learning how to sew on patches, testing both methods on scrap fabric helps you feel comfortable with your choice.
A common beginner option is a blanket stitch or running stitch for hand-sewn edges. On a machine, a zigzag edge around 2–4 mm width and 1–2 mm stitch length provides durable coverage while avoiding bulky edges. For thicker patches or heavy fabrics, you may need to adjust tension and stitch density.
To maximize your results, decide based on fabric type and patch backing. Denim usually responds well to machine stitching along the edge, but lighter fabrics may benefit from hand-tied finishes to prevent puckering and edge fraying. This consideration is a core part of beginner patch sewing and helps you choose the right method for your project.
Step-by-Step Patch Tutorial: From Layout to Finishing
This step-by-step patch tutorial walks you through the full process from layout to finishing. Start by placing the patch where you want it and pressing lightly to check alignment. The next move is securing the patch with pins or a temporary baste so you can remove pins as you stitch.
Choose thread color that suits your design. For beginners, a matching thread is a safe starting point to learn how to sew on patches. Then, begin stitching along the edge with your preferred method—hand blanket stitch or machine zigzag—keeping stitches small and even around curves.
After the first pass, inspect the edges for loose threads and reinforce as needed. Finish with a backstitch or tail knot, and press from the back to flatten stitches. If you’re patching multiple patches, re-check alignment between patches and repeat the steps for each addition.
When you finish, allow the garment to rest before washing; gentle handling helps set the stitches. This step-by-step patch tutorial is your practical, actionable guide to patch sewing on denim or other fabrics without feeling overwhelmed.
Care, Washing, and Longevity of Sew-On Patches
Patched garments respond well to careful washing and handling. Always turn the garment inside out and use a mild detergent to protect patch edges. Avoid high heat and vigorous agitation that can loosen stitches, especially on lighter fabrics or delicate patches.
To extend life beyond the first wash, press patches from the back with a low heat setting and avoid direct heat on patches for long periods. A quick drying cycle on medium heat can help set the stitching, but air-drying is often gentler for patch sealing and edge integrity.
For denim, consider a line of stitches that anchors edges securely so you can check that the backing remains stable after repeated wear. In your beginner patch sewing journey, maintenance becomes part of the process—your patches live longer when you treat them with care and patience.
Troubleshooting Common Patch-Project Challenges
As you learn how to sew on patches, you’ll encounter common issues like patches not lying flat or edges fraying after washing. Re-press gently with steam, re-pin, and re-stitch any lifted edges. Take time to test stitch length and tension on scrap fabric if you see puckering.
Another frequent challenge is dealing with fabric movement under the needle. Slowing down and guiding fabric evenly helps you produce clean stitches and reduces skipped stitches. If you notice frayed edges after washing, reinforce with extra stitches or a small overcast stitch around the edge.
Finally, keep your expectations realistic. Patch sewing on denim or heavier fabrics benefits from a slight stabilizer or tear-away stabilizer for thin fabrics; for busy designs, consider one or two patches at a time to maintain control on your machine.
Frequently Asked Questions
Patches for Beginners: how to sew on patches for a first denim jacket — what’s the simplest approach?
A good first project uses a flat-edged patch and a simple method. Start by pressing the area around the patch, place the patch where you want it, and secure with pins or baste to prevent shifting. For beginners, you can hand-stitch with a blanket stitch or use a machine with a wide zigzag stitch along the edge. Stitch slowly around the edge, especially around curves, then reinforce and tie off at the back. Finally, press from the back to set the stitches and let the garment rest before wearing.
Beginner patch sewing: what tools and patches are best when starting with patches for beginners?
Choose patches that sit flat against the fabric and have a clean edge. Gather basic tools: patches (woven, embroidered, or PVC work well on denim), matching or contrasting thread, a hand-sewing needle or a sewing machine with a zigzag foot, pins or fabric glue, scissors, and (optional) fusible interfacing or stabilizer for delicate fabrics. Also have an iron and ironing board. These basics keep your first patches durable and easy to position.
Step-by-step patch tutorial: can you outline a beginner-friendly process for patch sewing on denim?
Yes. 1) Place the patch where you want it and press to check alignment. 2) Secure with four pins or baste. 3) Choose a thread color that fits your look. 4) Start stitching along the edge: hand-stitch with a running stitch or blanket stitch, or machine-stitch with a small zigzag. 5) Slow down around curves; 6) Reinforce any loose edges; 7) Tie off and trim; 8) Press from the back. Repeat for additional patches.
Sew-on patches for beginners: what placement tips help avoid puckering and create a polished look?
Lay patches out on a flat surface and plan a balanced layout, perhaps in a staggered collage rather than a rigid grid. Use tape or a washable marker to map the design, then press the area and secure with pins or baste. For stitching, remove pins as you go and use a steady stitch pace. If using a machine, a temporary adhesive spray can help hold patches; for a near-invisible edge, you can use a back-slip stitch (more advanced).
Patch sewing on denim: how should a beginner prep fabric and patches for durable results?
Prep is key: press the patch area with a hot iron and, if the fabric frays, add a bit of interfacing or stabilizer behind the patch. Choose sturdy patches with woven edges for denim and plan a layout before sewing. Use a matching or contrasting thread, and stitch with a zigzag or tight satin edge for durability. On thick fabrics, adjust machine tension and test on scrap first. Finally, press again from the back to set stitches.
Patches for Beginners: how should I care for patches after sewing to keep them lasting?
Care matters. Wash the garment inside out on a gentle cycle and avoid high heat in dryers. Use a mild detergent to protect patch edges, and allow stitches to settle before wearing. For sew-on patches, avoid ironing directly on the patch; turning the garment inside out and pressing lightly can extend life. If you followed a step-by-step patch tutorial, you’ll have durable results that last through washes.
| Topic | Key Points |
|---|---|
| What you’ll learn | – Approach patch projects with a beginner-friendly mindsetn- Learn how to choose patches, position them for best look, and sew by hand or machinen- Keep edges neat and care for patched garmentsn- Follow a step-by-step patch tutorial to progress confidently. |
| Materials you’ll need | – Patches (woven, embroidered, or PVC) for denim, canvas, and sturdy fabricsn- Matching or contrasting threadn- Hand-sewing needle or sewing machine with zigzag footn- Pins or fabric glue to hold patches temporarilyn- Scissors and/or thread snipsn- Optional: fusible interfacing or tear-away stabilizer for delicate fabricsn- A garment or item to patch (denim jacket, backpack, jeans, or shirt)n- An iron and ironing board for prep and finishing |
| Why patches are great for beginners | – Patches are forgiving: you don’t need perfect seams around every edge and mistakes can be corrected quicklyn- They yield visible results with relatively low risk, building confidencen- Practice develops measuring, pinning, and fabric control, leading to a smoother workflow |
| Choosing the right patches | – Start with patches that sit flat against fabric with clean edgesn- Choose themes you love and patches that complement the garment colorn- For beginners, use a few medium patches rather than many tiny onesn- For denim, sturdy patches with woven edges hold up well; plan a layout on a flat surface before sewing (tape or washable marker can map the design) |
| Prepping the garment and patches | – Press the area around the patch to create a clean surfacen- If fabric frays, consider interfacing or stabilizer behind the patch to prevent edges from liftingn- Place the patch, then lightly press again to set the shapen- For several patches, lay them out in a staggered collage rather than a rigid grid |
| Positioning and securing the patch | – Use pins to hold in place or baste with long stitches for easy removal latern- Remove pins as you stitch around the edgen- On a machine, a temporary adhesive spray can help hold patches during stitchingn- For a near-invisible edge, a back-stitched slip stitch offers a clean finish (more advanced) |
| Stitching methods: hand vs machine | – Hand-stitching: running stitch or blanket stitch for control and a discreet lookn- Machine stitching: wide zigzag around the edge (2–4 mm width, 1–2 mm length) or a tight satin stitch for a sharp finish; adjust tension for thick patchesn- For thick fabrics, a straight stitch may work, but a zigzag edge is typically more durablen- Bloated edges: finish with a tight zigzag or small overcast stitch to prevent fraying |
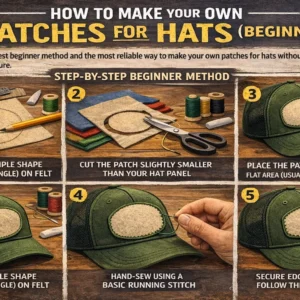
| Step-by-step patch tutorial (beginner-friendly) | 1) Place patch and check alignment. 2) Secure with 4 pins or baste. 3) Choose thread color. 4) Start stitching along edge (blanket stitch or zigzag). 5) Slow around curves to avoid skipping stitches. 6) Check for loose edges and reinforce. 7) Tie off on back and press. 8) Repeat for additional patches. |
| Finishing touches and care | – Press from the back to set stitches; use a thin cloth if heat-sensitiven- Let the patch sit for a few hours before washingn- Wash inside out on gentle cycle and use mild detergent to extend patch lifen- Iron-on patches differ from sew-on patches; sewing generally extends life |
| Common mistakes and quick fixes | – Patches not lying flat: re-press, re-pin, and re-stitch edgesn- Uneven stitches: slow down, test stitch length on scrap fabricn- Puckered fabric: use stabilizer or adjust machine tensionn- Edges fraying after washing: reinforce with extra stitches or small overcast stitch |
| Quick recap for Patches for Beginners | Patience, alignment, and consistent stitching are the keys to a successful sew-on patch project. Start with a simple patch layout, secure patches well, and choose a stitching method you’re comfortable with. Progress comes with each patch you complete; practice builds confidence. |
Summary
Conclusion: Patches for Beginners is about turning a small patch into a big sense of accomplishment. By choosing the right patches, preparing your fabric, and following a simple step-by-step patch tutorial, you can achieve durable, attractive results in a single session. Remember to press, check alignment, and practice with small stitches before moving to more complex designs. With time, you’ll be patching more to reflect your personal style, and you’ll be comfortable trying new patch shapes, sizes, and fabrics. Enjoy your sewing journey, and celebrate every patch you complete, because each one is a step toward greater confidence in beginner patch sewing.