
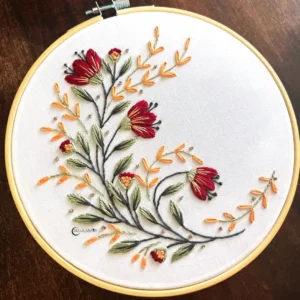
The embroidered design invites texture, color, and personal meaning to fabric, turning a simple surface into a story you can touch, wear, or display. For beginners, learning embroidery techniques for beginners can steadily transform hesitation into confident, controlled stitches, so you gain fluency with basic motion and rhythm. This guide focuses on practical stitching, starter tools, and a straightforward workflow to begin, from choosing materials to planning your first small motif. With steady practice and beginner embroidery tips, you’ll see measurable progress as each stitch settles into the fabric and your confidence grows. Whether you’re stitching on scraps or a project, building muscle memory makes each new motif feel possible, inviting experimentation and personal expression.
From a broader perspective, this needlework focuses on creating decorative textiles through careful planning and precise stitchwork. Think of it as textile art where patterns emerge from line, fill, and texture, rather than a single motif. If you’re wondering how to start embroidery, begin with simple materials, clear transfer methods, and a forgiving surface that accepts the stitches. For fresh ideas, explore embroidery design ideas for beginners and adapt projects to your own color story and fabric choices. A gentle progression—from basic stitches to light shading and varied textures—helps novices build confidence without feeling overwhelmed.
Embroidered Design Mastery: From Idea to Textile Texture
An embroidered design is more than a motif on fabric—it is a dialogue between thread, light, and weave. The texture you build with each stitch adds depth, from bold contours to delicate shading, turning simple shapes into living art. As a beginner, you’ll learn to plan the line work, fill, and density that give your piece character, while gradually building confidence in your hand embroidery stitches and overall technique.
Approach this journey with curiosity: start with clear silhouettes and small color palettes, then layer in texture as you gain control. Even basic shapes can feel sophisticated once you fine-tune stitch order, thread thickness, and tension. This is where the ideas of embroidery techniques for beginners become practical, guiding you to a finished embroidered design that looks deliberate, not rushed.
Tools, Materials, and Setup for a Smooth Start
A well-chosen toolkit makes learning how to start embroidery less daunting and more enjoyable. Begin with weave-friendly fabrics like cotton or linen, preferably in light colors to clearly see each stitch. A taut hoop or embroidery frame helps you maintain even tension, which is essential for clean lines and consistent fills.
Stock up on versatile threads, needles suited to your thread thickness, and simple transfer aids. Cotton embroidery floss, a sharp needle, and basic scissors are enough to begin. With the right tools, your practice sessions become precise and focused, allowing you to translate your design ideas into stitch work without fighting your materials.
Hand Embroidery Stitches: Your Beginner Toolkit
Mastering a core set of stitches—backstitch, running stitch, satin stitch, split stitch, and French knot—forms the backbone of most projects. These hand embroidery stitches let you outline, fill, texture, and add decorative details. Practicing the rhythm of bringing the needle up and down at consistent intervals helps you build muscle memory and recall under pressure.
Focus on even tension and uniform stitch length rather than speed. The graceful result comes from practice and control, not hurried executions. As you progress, experiment with thickness, density, and stitch mixing to create dimension, keeping beginner embroidery tips in mind to avoid common missteps like pulled threads or uneven lines.
A Simple, Structured Workflow to Kickstart Your Embroidered Design
Starting an embroidered design begins with a clear motif: a simple leaf, flower, initial, or geometric border. Define a limited color palette and plan where outlines and fills will live on the fabric. This aligns with a practical workflow that makes how to start embroidery approachable and less intimidating.
Next, prepare and transfer: wash and iron your fabric, secure it in the hoop, and transfer the motif with a light touch. Thread choice matters—one color for beginners keeps things manageable, while a few complementary colors can add depth as confidence grows. Begin stitching with a bold contour using backstitch or running stitch, then gradually fill areas with satin or split stitches, finishing with neat knots at the back.
Embroidery Design Ideas for Beginners: Projects You Can Finish Fast
A steady stream of simple projects keeps motivation high. Consider floral motifs with single-color petals, borders along edges of napkins or bookmarks, monograms with decorative outlines, geometric shapes with consistent fills, or nature-inspired silhouettes like a small bird or leaf cluster. These embroidery design ideas for beginners are intentionally approachable and provide clear opportunities to practice core stitches.
As you start, keep the scope small and celebrate small wins. Begin with a single color and add texture gradually, then layer color or try a second hue once you’re comfortable. This incremental approach helps you see tangible progress, reinforcing the sense that each completed piece is a step forward in your embroidery journey.
Troubleshooting, Finishing, and Keeping Momentum
Common hurdles include tension issues, uneven stitches, and fraying edges. If threads pull, relax your grip slightly and adjust your needle angle. Shorter stitch lengths tend to produce more control, and keeping the hoop taut reduces distortion. These are practical tips from beginner embroidery tips you can apply right away.
Finish with care: secure threads on the back, trim close but not too close, and weave ends into nearby stitches for a neat look from both sides. Track your progress with a simple log or photo journal to stay motivated, and allow each completed piece to reinforce your skills in embroidery techniques for beginners. With consistent practice, your early projects evolve into more complex embroidered designs you’ll be proud to wear or gift.
Frequently Asked Questions
What defines an embroidered design and why is it a good starting project in embroidery techniques for beginners?
An embroidered design is a stitched motif that uses line work, fill, shading, and texture to bring fabric to life. It’s a practical entry point for embroidery techniques for beginners because simple stitches and controlled thread density teach fundamentals, help you build muscle memory, and show how different stitches create dimension.
How do you start embroidery when working toward an embroidered design?
Start with a simple motif, prepare and hoop the fabric, and transfer the design using a light pencil or transfer paper. Choose a limited color palette, begin with a major contour using backstitch or running stitch, and finish by securing threads neatly on the back. This beginner-friendly workflow keeps your embroidered design approachable and steady.
Which hand embroidery stitches are essential for an embroidered design?
Key hand embroidery stitches for an embroidered design include backstitch for clean outlines, running stitch for light shading, satin stitch for solid fills, split stitch for textured fills, and French knots for dimension in centers or details. Practice these stitches to achieve even tension and smooth transitions in your design.
What embroidery design ideas for beginners are best for an easy embroidered design?
Great embroidery design ideas for beginners include floral motifs with simple petals, borders or corners, monograms, geometric shapes, and nature-inspired silhouettes. Start with one color, then gradually add a second color or texture as you gain confidence in your embroidered design.
What beginner embroidery tips help improve the quality of an embroidered design?
Tips include using a single thread strand for delicate lines and multiple strands for bold lines, keeping needles sharp, moving slowly for consistency, practicing clean finishes on the back, and transferring lines accurately to maintain a neat embroidered design.
What tools and materials do I need to start a simple embroidered design?
For a beginner-friendly embroidered design, gather fabric (cotton or linen), a hoop or frame, cotton embroidery floss, various needles, scissors and pins, a needle threader, and transfer tools. Start on scrap fabric, practice basic stitches, and gradually work toward a finished piece.
| Aspect | Key Points |
|---|---|
| What is embroidered design? | An embroidered design combines line work, fill, shading, and texture to bring fabric to life; stitches interact with fabric and thread to create dimension, making simple shapes look sophisticated with the right stitches and density. |
| Starting point for beginners | Focus on fundamentals, practice steadily, and build muscle memory stitch by stitch on practice fabric. |
| Tools & materials | Fabric (cotton/linen), hoops/frames, cotton embroidery floss, sharp or crewel needles, scissors/pins/threader, transfer tools. |
| Basic stitches | Backstitch, running stitch, satin stitch, split stitch, French knot; maintain even tension and consistent length. |
| Workflow for beginners | Pick motif, prepare fabric, transfer design, choose threads, start stitching, finish neatly. |
| Design ideas | Floral motifs, borders, monograms, geometric shapes, nature silhouettes; start with a single color and add color gradually. |
| Practice plan | Weekly progression: master basics, add satin, then textured stitches, complete a small piece. |
| Common challenges | Tension issues, uneven stitches, fraying; solutions include looser tension, shorter stitches, and stabilizers. |
| Beginner tips | Use single or multiple thread strands as needed; keep needles sharp; don’t rush; finish neatly on the back. |
| Simple project idea | Stitch a coaster or bookmark using a single motif to apply fundamentals. |
| Troubleshooting | Jagged edges, color bleed, or messy backs; reassess transfer, manage threads, and secure ends. |
Summary
The embroidered design journey is a tactile, expressive path that invites you to explore texture, color, and form on fabric. The embroidered design process begins with fundamentals—steady stitches, even tension, careful transfer, and neat finishes—and grows into layered pieces where color, density, and stitch variety create depth. With patient practice and a simple workflow, beginners gain confidence, translating ideas into tangible embroidered design pieces you’ll be proud to wear, gift, or display. Through small projects and steady progression, you’ll see how practice shapes muscle memory and style, turning initial attempts into intricate, beautiful embroidery.