
DIY Embroidered Denim offers a stylish, personalized way to refresh old jeans or add a statement piece to your wardrobe. In this guide, you’ll learn how to embroider denim jeans with careful preparation, stitch choice, and clean transfer techniques. From fabric stabilizers to a variety of stitches, explore denim embroidery patterns and step-by-step denim embroidery approaches that suit beginners and seasoned crafters alike. You’ll find embroidered denim ideas ranging from florals to geometric motifs that can be adapted to any shade of blue. By choosing durable threads and finishing with proper care, your embroidery project on denim will endure daily wear and still look fresh.
Alternatively described as a hand-stitched denim embellishment, this craft adds decorative threadwork to jeans and jackets. Think of it as personalized jean art that comes together with simple transfer techniques, even when you’re working with a basic toolkit. By choosing approachable stitches and sturdier fabrics, you can achieve lasting results while exploring different embroidery approaches on denim. Using terms like embroidered denim, denim embellishment ideas, jean embroidery patterns, and stitch-based customization helps connect related topics for readers and search engines.
Frequently Asked Questions
What is DIY Embroidered Denim and how can I start a step-by-step denim embroidery project?
DIY Embroidered Denim is the process of personalizing jeans or a denim jacket with embroidery to create a unique piece. To start a step-by-step denim embroidery project: pick a design that fits your area, gather supplies (denim garment, embroidery floss or perle cotton, needles size 7–9, a small embroidery hoop, and a stabilizer), transfer the design with a washable pen or lightbox, stabilize the area, choose stitches, practice on scrap, then stitch on the garment, finish by trimming threads and pressing, and finally launder inside out.
How to embroider denim jeans: which stitches work best for DIY Embroidered Denim?
For DIY Embroidered Denim on jeans, begin with simple stitches: backstitch for outlines, satin stitch for fills, and running stitch for delicate lines; add texture with French knots or lazy daisies. Practice on scrap denim first to gauge tension, and choose thread colors that complement the denim. Avoid overly bulky stitches near seams or pockets for a cleaner finish.
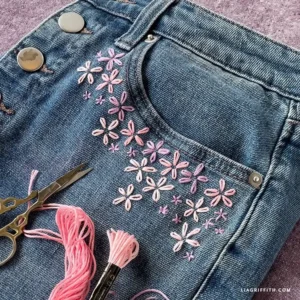
What are some embroidered denim ideas for beginners?
Embroidered denim ideas for beginners include florals around pockets, small geometric shapes along seams, a monogram on the back pocket, or a delicate cuff motif. Start with a single motif on a flat area like the front thigh to build confidence, then expand to mixed stitches and colors for a layered look.
How can I transfer designs for denim embroidery patterns without puckering?
To transfer designs for denim embroidery patterns, try tracing with a washable fabric pen, using a lightbox, or applying a water-soluble marker. Stabilize the area to minimize wrinkling and test the transfer before stitching. Start on flat areas such as the front thigh or back yoke for best results.
Which stabilizers and finishing touches are essential for DIY Embroidered Denim?
Key stabilizers and finishing touches include placing a stabilizer behind the stitching area and using a tear-away or cut-away stabilizer; consider fusible interfacing for lightweight denim if needed. Keep stitches taut but not stretched, finish by knotting securely, trimming ends, and gently pressing with a cloth between the iron and embroidery to protect the threads.
How should I care for my DIY Embroidered Denim to maximize durability?
Care for DIY Embroidered Denim by washing inside out in cold water and air drying when possible. Avoid high heat and harsh detergents that can fade threads. For high-wear areas, consider reinforcement behind the embroidery to extend its life and keep the piece looking its best.
| Section | Key Points | Tips / Notes |
|---|---|---|
| Materials and tools | Denim garment, embroidery floss or perle cotton, embroidery needles (size 7 or 9), small embroidery hoop, fabric stabilizer or interfacing; optional sewing machine for placement/basting. | Choose sturdy denim and gather floss, needles, hoop, stabilizer, and optional machine support for placement. |
| 1) Design selection and planning | Begin with a clear design (florals, geometric shapes, initials/monogram, or small motif). Plan how the embroidery will move with denim’s curves; keep fabric taut in the hoop without over-pulling. | Start simple if unsure; consider how design sits on front thigh, back yoke, or seams. |
| 2) Transfer your design | Transfer onto denim using washable fabric pen, lightbox, or water-soluble marker; mid-weight transfer helps reduce wrinkling; target flat areas for easier stitching. | Test transfer method on scrap fabric first. |
| 3) Stabilize the fabric | Place stabilizer behind the stitching area or use lightweight tear-away stabilizer to prevent puckering; more stabilization for lightweight denim or high-wear areas (or fusible interfacing compatible with the fabric). | Use appropriate stabilizer depth and type for your project. |
| 4) Stitching techniques and tips | Use basic stitches: backstitch for outlines, satin stitch for fills, running stitch for outlines/decorative details; consider lazy-daisy/French knots for texture, chain stitch for vines; practice on scrap to gauge tension and length; plan color order to minimize back threads. | Build gradually; experiment with mixed stitches for a layered look. |
| 5) Placement and technique on different denim areas | Front thigh for larger motifs; pockets for smaller designs; cuffs for borders or peeks when rolled; avoid stitching too close to seams; mix stitches and colors to mimic shading. | Consider spacing and seam distance to prevent irritation. |
| 6) Finishing touches and care | Knot and trim threads, remove stabilizer if needed, press gently with a cloth between iron and embroidery; wash garment inside out in cold water and hang dry; secure back stitches to withstand daily wear. | Avoid heat; handle delicate areas with care. |
| 7) Design ideas and inspiration | Florals, geometric designs, monograms; tonal thread with bold accent colors; patterns can be subtle or bright; adapt ideas to personal style and garment area. | Experiment with floral on thighs or back pockets, geometric along seams. |
| 8) Common mistakes and fixes | Puckering, thread breaks, bulky stitches, heavy transfer lines, or fraying; solutions include stabilizers, adjusting stitch length, using fewer threads, light transfer lines, and adding a small zigzag on edges. | Check tension and technique frequently; fix issues early. |
| 9) Maintenance and durability | Regular, gentle care; avoid high heat; consider reinforcement patches or fabric sealant for longevity; embroidery can be durable with proper care. | Hand wash or gentle cycle, air dry, inspect periodically. |
| 10) Bonus: how to start today | Begin with a simple motif on a small area to build confidence; choose a cohesive color theme; practice spacing and balance to achieve a cohesive look. | Practice on scrap first; gradually take on larger areas. |
Summary
HTML table summarizing the key points of the base content for DIY Embroidered Denim.