
DIY Embroidered Patches offer a fun, creative way to personalize clothing, bags, hats, and gear with a burst of personality, turning ordinary items into wearable canvas for your stories. From framing a worn jacket to brightening a tote, this project blends accessible techniques with satisfying results, guiding beginners through patch embroidery stitches, color theory, fabric choices, and practical troubleshooting along the way. In this embroidered patches tutorial, you will learn how to design, stitch, and finish patches that look professional and durable, from selecting motifs and scales to stabilizing the fabric, testing adherence, and finishing embroidered patches to ensure clean edges before you commit. With a little planning, the right materials, and a few stitches, you can turn simple fabric scraps into high-quality adornments that express your style, suit different garment types, and withstand everyday wear with confidence. The goal is a practical, stylish project you can wear or gift, ideally starting with DIY fabric patches that grow into design ideas, sparking creativity for wardrobes, accessories, and thoughtful handmade gifts.
For readers exploring this craft, think of them as personalized fabric badges, sewn-on decorations, or decorative textile patches that transform everyday garments. The concept centers on combining design ideas with a sturdy stitch palette, from simple running stitches to dense satin fills. LSI principles guide you to use related terms such as fabric embellishments, sew-on artwork, and decorative embroidery accents that signal similar topics to search engines and curious crafters. Whether used on backpacks, jackets, or hats, these patch-based embellishments rely on durable materials and finishing steps to withstand frequent wear. By presenting the topic through several semantically related terms, creators can connect with readers seeking tutorials on color, texture, and stitching techniques.
1) DIY Embroidered Patches: A Beginner-Friendly Guide to Patch Embroidery Stitches and Finishing
DIY Embroidered Patches offer a fun, approachable entry point into clothing and accessory customization. In this embroidered patches tutorial, you’ll discover how to design, stitch, and finish patches that look polished and hold up to daily wear. With clear steps and practical tips, you’ll move from concept to a wearable piece you’re proud to show off, even if you’re just starting out.
For beginners, starting with a simple shape and a small motif makes mastering patch embroidery stitches and finishing embroidered patches more approachable. This foundation helps you learn tension, stitch length, and edge control while keeping the project enjoyable. As you gain confidence, you can expand into more complex designs and bolder color palettes while keeping durability in mind.
2) Design Ideas that Elevate Your DIY Fabric Patches: Motifs, Shapes, and Color Palettes
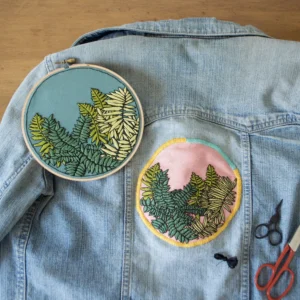
A great patch begins with a concept that reflects your personality or interests. Design ideas range from nature motifs like flowers and leaves to playful pop-culture references or abstract geometric shapes. The emphasis is on translating these ideas into a stitch-friendly format that sits well on your chosen fabric.
When planning color palettes and shapes for your DIY fabric patches, consider how the patch will be used and the fabric weight. Think about contrast, shading, and scale so that the design reads clearly from a distance. This approach makes your patches feel cohesive when mixed with other items in your wardrobe.
3) Materials, Tools, and Setups for Successful Patch-Making
A well-supplied workbench sets the tone for a smooth patch-making process. Choose a sturdy fabric base such as twill, canvas, denim, or a cotton blend, and pair it with a stabilizer to prevent puckering. The right threads, needles, and scissors help you achieve clean edges and consistent stitches.
A practical setup includes an optional embroidery hoop, a water-soluble pen for transfer, and reliable backing options like iron-on or sew-on. Having a clear plan for where the patch will live and how you’ll attach it informs your choices for stabilizers and backing, ensuring the result lasts through many wears and washes.
4) Transferring Your Patch Design: Methods for Clean Edges and Accurate Stitching
Transferring the design accurately is crucial for clean edges and balanced proportions. Common methods include trace transfer with water-soluble ink, freehand drawing for a rough sketch, print-and-cut with carbon transfer, and stabilizer-guided transfer for precise lines. Each method has its own advantages depending on patch size and detail.
Always test transfer on a scrap fabric first to verify visibility and line clarity. Re-mark if necessary before stitching, and consider securing guidelines with a light, erasable pen to keep your edges crisp as you work. A careful transfer lays the foundation for a professional-looking patch.
5) Mastering Patch Embroidery Stitches: From Satin Fill to Decorative Borders
A robust patch project relies on a balanced mix of patch embroidery stitches to create texture, depth, and durability. Key stitches include satin stitch for solid fills, stem stitch or backstitch for clean outlines, and running stitch or lazy daisy for subtle shading. Decorative touches like French knots or seed stitches can add focal points.
As you practice, aim for consistent stitch length and tension to maintain a cohesive appearance across curved and irregular edges. Planning the density of stitches in larger filled areas helps prevent uneven patches, ensuring your final piece looks intentional and professional.
6) Finishing, Backing, and Attaching Patches for Durable Wear
Finishing edges matters: options such as a tight satin edge, a Merrowed border (if you have the equipment), or a decorative hand blanket stitch all contribute to durability and a polished look. Finishing embroidered patches with a secure edge helps prevent fraying and keeps threads tidy after washing.
Backing choices shape how you’ll attach the patch: iron-on for quick application, sew-on for maximum durability, or Velcro for removable patches. Once applied, follow care tips to preserve color and stitch integrity—turn garments inside out for washing and air-dry to extend the life of your patches.
Frequently Asked Questions
What is the essential starting point in a DIY Embroidered Patches project?
Begin with a clear concept and design ideas, then translate it into a stitch‑friendly patch size and shape. In the DIY fabric patches workflow, start with simple forms like circles or squares and a basic motif to keep the embroidered patches tutorial approachable. Sketch or print your idea and decide on the fabric base and transfer method before you stitch.
Which patch embroidery stitches are best for beginners in the embroidered patches tutorial?
Key stitches to learn include satin stitch for solid fills, backstitch or stem stitch for outlines, and running stitch for shading. Practice these on a scrap swatch to keep tension even and achieve consistent stitch length. These stitches cover common design ideas and help you reach a professional look for DIY fabric patches.
How can I finish embroidered patches to ensure durability and a professional appearance?
Finish with a clean edge using options like a satin edge or a merrowed edge if you have the equipment. Choose a suitable backing (iron‑on, sew‑on, or Velcro) based on how you want to attach the patch. Secure the border with appropriate stitching and test adhesion on scrap fabric before final application, following the finishing embroidered patches guidance.
What are effective methods for transferring a design when making DIY Embroidered Patches?
Use reliable transfer methods such as tracing with a water‑soluble pen, freehand drawing, or print‑and‑cut with carbon transfer. Stabilizers can guide or support the pattern for small patches with fine lines. Always check lines for clarity and re‑mark if needed before stitching.
What backing options work best for DIY fabric patches, and how do I apply them?
Backings include iron‑on for quick applications, sew‑on for durability, and Velcro for removable patches. Apply iron‑on backing with careful heat and pressure per fabric guidance, or stitch around the edge for sew‑on patches. Choose a backing based on the fabric weight and intended wear.
What design ideas and patch shapes work well for DIY Embroidered Patches?
Start with simple shapes like circles, squares, or ovals and motifs such as leaves, initials, or symbols that fit your garment. Use design ideas to mix bold fills with shading and texture, employing a mix of stitches to add depth. As you gain confidence, try more complex imagery while keeping proportion and color balance in mind.
| Area | Key Points |
|---|---|
| Overview |
|
| Design: Ideas, Size, and Shape |
|
| Materials & Tools |
|
| Transferring the Design |
|
| Stitching Techniques |
|
| Stability & Backing |
|
| Finishing Edges |
|
| Backing & Attachment |
|
| Attaching Your Patch |
|
| Care & Maintenance |
|
| Design Ideas to Inspire |
|
| Common Mistakes |
|
| Expanding Your Patch-Making Skills |
|
| Conclusion: Your Patch Journey Starts Here |
|
Summary
DIY Embroidered Patches empower crafters to transform plain garments into personalized, durable accessories. This guide walks you through designing, selecting materials, transferring designs, mastering stitches, finishing edges, choosing backing, and caring for patches so they last. With planning, practice, and a little experimentation, you can create patches that express your style and withstand daily wear, whether you patch a jacket, bag, hat, or backpack.